
 |
 |
|
|
 03-05-2010, 05:29 AM
|
#1 |
  Drives: 08 Yaris Sedan Join Date: Oct 2008
Location: California - Bay Area
Posts: 2,773
|
DIY Leather Wheelskin Install / Pics Inside
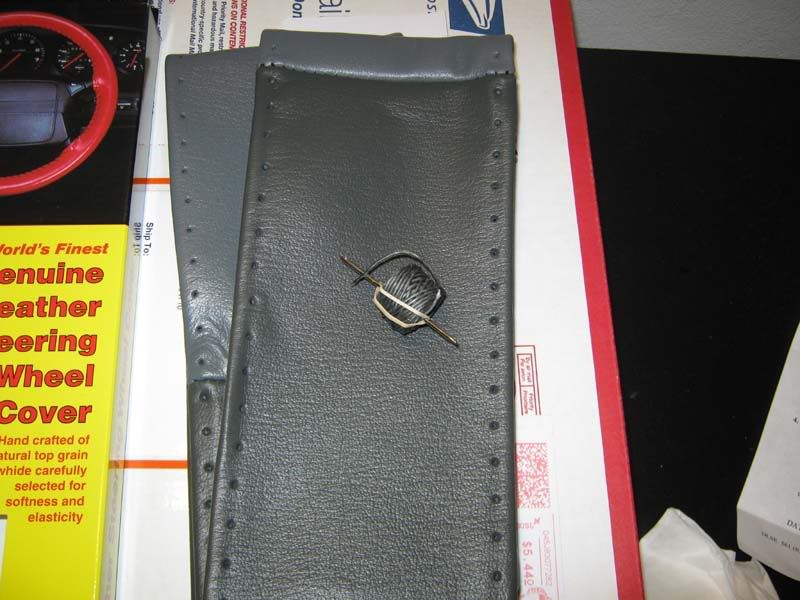 Step 1: Remove from the box your new wheelskin and thread and needle. Unravel the thread completely so there are no knots at all and thread the needle. 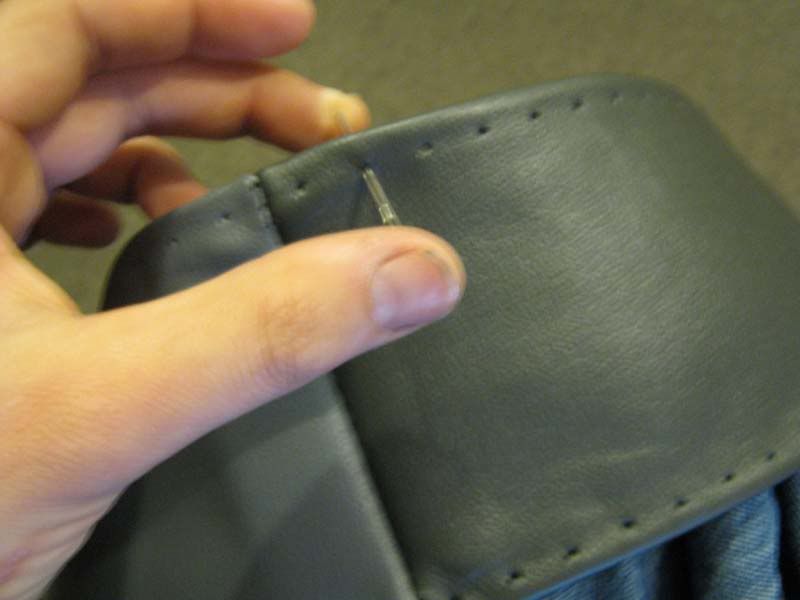 Step 2: Punch out any loose chads. I would take the needle and poke out every hole just to be on the safe side when I did mine there were about 10 chads that fell out. If not they will come out while you are stiching and you will have an annoying bump. 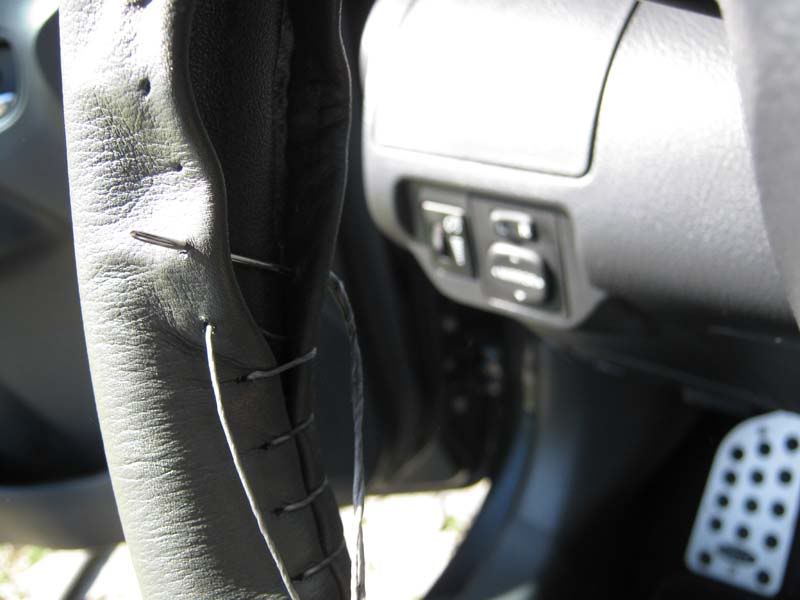 Step 3: Start between one of the spokes but not at a seam. When sewing to save time go through two holes at once as show in picture. 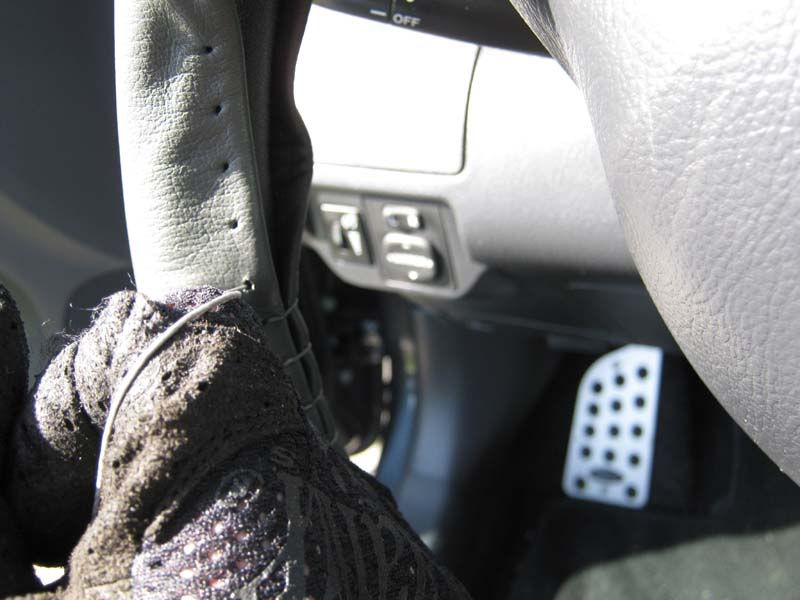 Step 4: Between finger and thumb pull extremely hard after every stitch. Wearing gloves is highly recommended . Even with gloves your finger will be sore when you are done. From start to finish its going to take at least a hour so take your time. 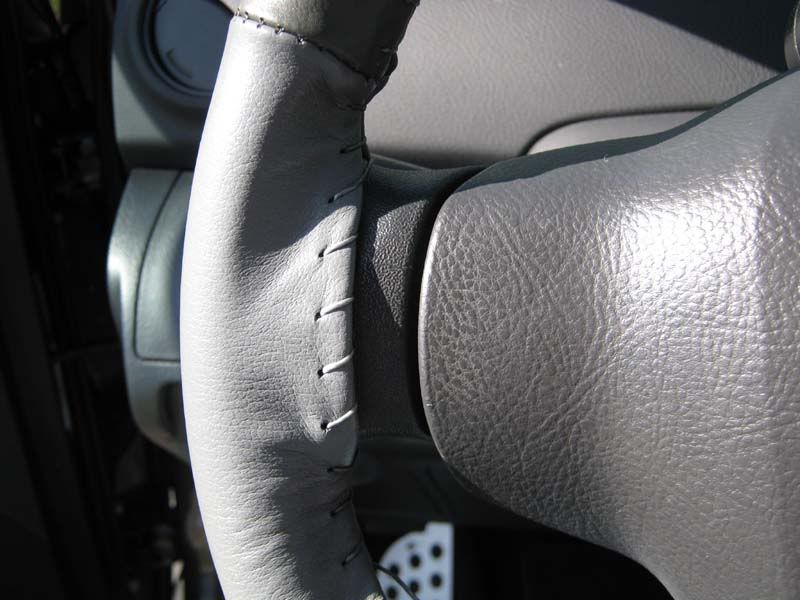 Step 5: When coming to a spoke skip 4 holes and loop around the front for a false stitch. Keep note however many holes you decide to skip start at that same place when you continue. If easier rotate the wheel so you can see from the back the holes you missed. Otherwise you will find out the hard way when you finish you missed a stitch. 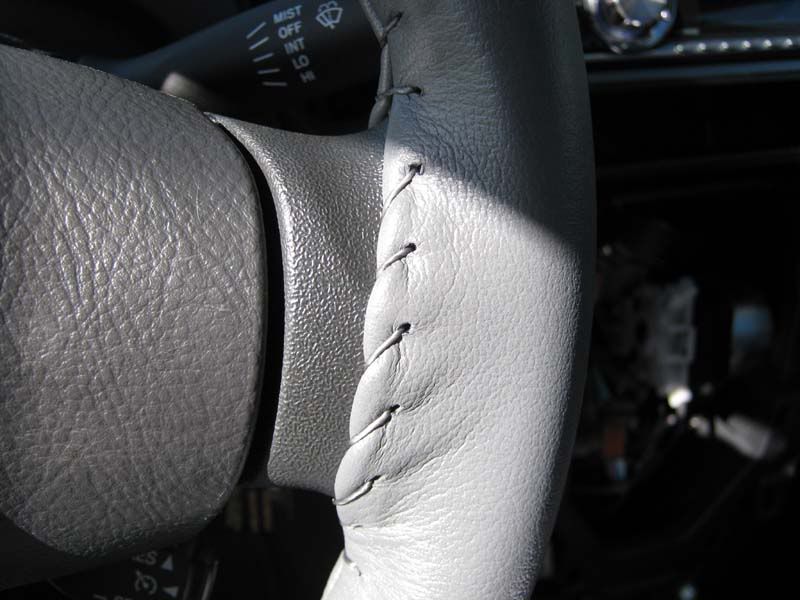 Also note make sure you are still keeping the line taught compare to the previous pic you can see how it looks loose. I had to go back and redo that spoke. 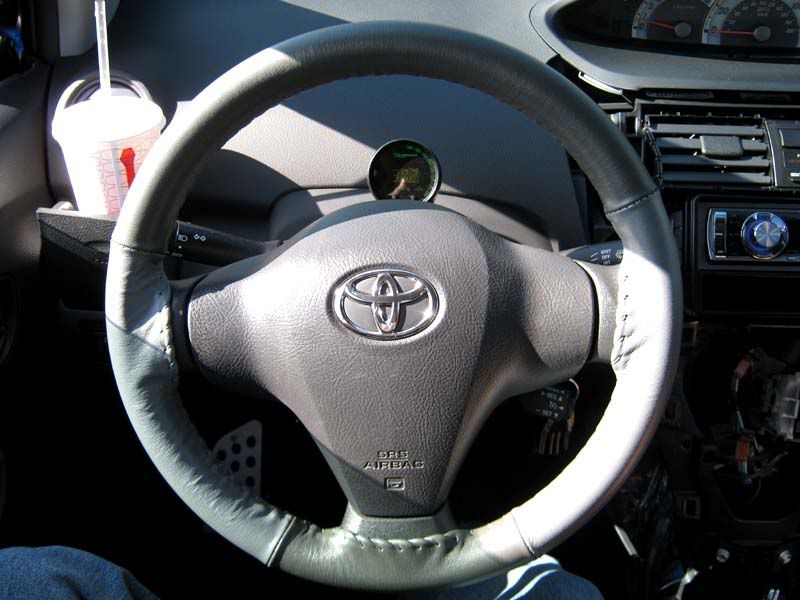 Step 6: When you are finished tie a double knot and cut off the loose ends. Take a flat head screwdriver and gently tuck it in. Enjoy your new leather steering wheel.
__________________
|

|

|
|
03-05-2010, 05:35 AM
|
#2 |
|
Drives: 08 Yaris Sedan Join Date: Oct 2008
Location: California - Bay Area
Posts: 2,773
|
Side note if your curious about trying this but not sure what color matches your interior you can have them mail you swatches for free on their website http://wheelskins.com/. I found their charcoal color is a nearly dead match to my interior. This is a easier and cheaper method than changing out the entire steering wheel. And easily reversible if you sell the vehicle or change your mind down the road.
__________________
|
|
|
|
|
03-05-2010, 12:38 PM
|
#3 |

Drives: '09 Yaris carmine red 2d HB Join Date: Jun 2009
Location: Middletown, NY
Posts: 1,501
|
Excellent DIY

|
|
|
|
|
03-06-2010, 05:23 AM
|
#4 |

Drives: YRX Join Date: Mar 2010
Location: Australia
Posts: 85
|
Well done, looks great

|
|
|
|
|
03-08-2010, 08:29 AM
|
#5 |
|
Drives: VIOS Join Date: Nov 2009
Location: Malaysia
Posts: 42
|
maybe if used black or red thread look more sporty..:)..but very nice DIY
|
|
|
|
|
03-10-2010, 11:47 AM
|
#6 |

Drives: '08 Yaris Sedan, Aero Package Join Date: Oct 2008
Location: Burlington, Ontario, Canada
Posts: 1,720
|
It's been a few days now. Are you satisfied with the results? Would you do it again?
NOTE: I requested samples or black, charcoal and grey. My sedan has a charcoal (almost black) interior with silver accents.
__________________
TRD Upgrades: 18" Wheels wrapped in 215/35/18 PZero's, Sportivo Shocks/Struts, Lowering Springs, Swaybar, Axle-Back Exhaust, Oil Cap, Rad Cap, Signage. Aftermarket Goodies: Piggies SS, K&N Drop-In, Blitz S/C, DC Header, NST Pulley) Toyota Options/Accessories: Sport Pedal Covers, Sport Shift Knob, Ipod Interface, Summer Mats, Winter Mats, Cruise Control, Auto-Dim Mirror, Echo steelies with winter boots. 
|
|
|
|
|
03-10-2010, 02:01 PM
|
#7 |
|
Drives: 08 Yaris Sedan Join Date: Oct 2008
Location: California - Bay Area
Posts: 2,773
|
Really depends on driving style. Since i drive super aggresive i noticed i cant use the thumb grips by the spokes because the cover adds a little bit of bulk. If our factory wheel was a little thinner like some hondas then the cover would be perfect. So not sure about it so much now. Cosmetically i think a all plain charcoal cover would look perfect especially if you do a baseball stich will look oem. If you plan to do that make sure you request 2 threads when you order.
__________________
|
|
|
|
|
03-10-2010, 06:43 PM
|
#8 | |

Drives: 2008 HB, A/T, Power W/L/M Join Date: Oct 2008
Location: LI, New Yawk
Posts: 2,063
|
Quote:
I thought everything needed would already come with it. Also, what size/diameter did you buy? BTW  great job! great job!
__________________
Never take eyes off opponent - Bruce Lee |
|
|
|
|
|
03-10-2010, 06:53 PM
|
#9 | |
|
Drives: 08 Yaris Sedan Join Date: Oct 2008
Location: California - Bay Area
Posts: 2,773
|
Quote:
__________________
|
|
|
|
|
|
03-12-2010, 11:46 AM
|
#10 |

Drives: 2009 Yaris LB in Blazing blue Join Date: May 2009
Location: Western PA (Franklin)
Posts: 237
 |
Awesome I just installed mine today and love it.. My hands are a little raw but I will heal. I went with the grey color so I have a little contrast nice write up btw.
|
|
|
|
|
03-17-2010, 12:26 AM
|
#11 |
|
Drives: 2010 Yaris 3 dr hb Join Date: Nov 2009
Location: The Villages, FL
Posts: 146
|
Awesome find YarisSedan.
|
|
|
|
|
03-17-2010, 01:03 PM
|
#12 | |
|
Drives: '08 Yaris Sedan, Aero Package Join Date: Oct 2008
Location: Burlington, Ontario, Canada
Posts: 1,720
|
Quote:
2)And did you use any adhesive or double-sided tape to hold the leather in place to get started? 3)Is you sedan dark charcoal grey like mine? Tough to tell in the photo's.
__________________
TRD Upgrades: 18" Wheels wrapped in 215/35/18 PZero's, Sportivo Shocks/Struts, Lowering Springs, Swaybar, Axle-Back Exhaust, Oil Cap, Rad Cap, Signage. Aftermarket Goodies: Piggies SS, K&N Drop-In, Blitz S/C, DC Header, NST Pulley) Toyota Options/Accessories: Sport Pedal Covers, Sport Shift Knob, Ipod Interface, Summer Mats, Winter Mats, Cruise Control, Auto-Dim Mirror, Echo steelies with winter boots.
|
|
|
|
|
|
03-17-2010, 02:07 PM
|
#13 |
|
Drives: 08 Yaris Sedan Join Date: Oct 2008
Location: California - Bay Area
Posts: 2,773
|
No but if you google baseball stich wheelskin there are lots of diys with pictures. The leather is super super tight. Took me a while to work it on to the wheel. It does not move at all. And yes my interior is the same as yours.
__________________
|
|
|
|
|
03-19-2010, 11:47 PM
|
#14 |
|
Drives: 2007 Toyota Yaris Sedan Join Date: Mar 2010
Location: Orlando
Posts: 39
|
This is what mine looks like, my girlfriend got it for me. Matches the interior quite nicely. Will eventually change out seats for something that matches the colors of it (black outside, sand inside). Here's the link. The picture is too big dunno how to resize.
http://img19.imageshack.us/img19/7088/0319001638.jpg Last edited by Qilene15; 03-19-2010 at 11:52 PM. Reason: Picture didn't show up |
|
|
|
 |
|
|
 Similar Threads
|
||||
| Thread | Thread Starter | Forum | Replies | Last Post |
| DIY: TRD shift knob kit install | auxmike | DIY / Maintenance / Service | 15 | 07-28-2020 02:38 PM |
| DIY Variable Speed wiper stalk install | DanQ | DIY / Maintenance / Service | 27 | 08-03-2017 07:22 PM |
| DIY: Braille Battery install | texkid | DIY / Maintenance / Service | 39 | 02-19-2013 02:40 PM |
| DIY needed for amplifier for sedan install | YarisSedan | In Car Entertainment + Electronics (audio / video / alarm) | 2 | 02-27-2009 10:07 PM |
| Leather Steering Wheel Install | 1NZYaris1 | Cosmetic Modifications (Exterior/Interior) | 16 | 10-24-2008 04:52 PM |


 Linear Mode

