
 |
 |
|
|
 09-25-2012, 09:42 AM
|
#1 |
|
What I thought I'd do was

Drives: 09 Yaris Sedan Join Date: Aug 2009
Location: Northwest Alabama
Posts: 1,140
|
Blitz install questions
Alrighty, I got started on my Blitz install last night. Made decent progress up until actually mounting the manifold to the engine. It says in the guide to move the fuel rail out of the way, but I dunno how you are supposed to move it with the tube running through this hole.
 Everything fit in place without having to move the fuel rail, but I can't get to the nut that goes into the bottom of the manifold. 
__________________
 My Nissan Hardbody (D21) 4x4 build log Check out my YouTube channel (mostly shooting) - http://www.youtube.com/user/47MasoN47 |

|

|
|
09-25-2012, 10:20 AM
|
#2 |
  
Drives: 06 Polar White 5dr, 13 Soul 4u Join Date: Oct 2008
Location: Georgetown, Ontario, Canada
Posts: 5,740
|
With a little persuasion, you can move tip/tilt the rail enough to allow access to the bolt. I've worked on two installs, and was a little timid with the first one. Have no fear, you won't break anything.
__________________

|
|
|
|
|
09-25-2012, 10:23 AM
|
#3 |
|
ULTIMATE Drives: 07 Yaris Turbo Join Date: May 2007
Location: Canoga Park, CA
Posts: 14,859
 |
^ +1.
Also remember your altenator gets turned upside down, as I recall. Did you download the edited instructions from our forums?
__________________
Micro Image forums, online store and shop are now closed. It was a great eight year run, but it was time to focus on other things. I'm still selling parts on eBay under micro*image seller ID and customers can still make requests for anything specific. |
|
|
|
|
09-25-2012, 10:33 AM
|
#4 |
|
What I thought I'd do was
Drives: 09 Yaris Sedan Join Date: Aug 2009
Location: Northwest Alabama
Posts: 1,140
|
I got the alternator installed (although I had to mount the alternator to the bracket, then install the whole thing rather than install the bracket then mount the alternator to it as the instructions say). With the angle of that picture the alternator is perfectly hidden, ha.
I believe I got the right instructions, this is the one I used.
__________________
My Nissan Hardbody (D21) 4x4 build log Check out my YouTube channel (mostly shooting) - http://www.youtube.com/user/47MasoN47 |
|
|
|
|
09-25-2012, 11:06 AM
|
#5 |
|
ULTIMATE Drives: 07 Yaris Turbo Join Date: May 2007
Location: Canoga Park, CA
Posts: 14,859
|
Yes, that's the better set of instructions, edited by JoJo.
__________________
Micro Image forums, online store and shop are now closed. It was a great eight year run, but it was time to focus on other things. I'm still selling parts on eBay under micro*image seller ID and customers can still make requests for anything specific. |
|
|
|
|
09-25-2012, 12:29 PM
|
#6 |
ULTIMATE
Drives: 09 5dr LB, 2x 08 3dr LB Join Date: Oct 2008
Location: USA, CT
Posts: 13,460
|
Check out this thread as well from when I installed mine. It may save you some time:
http://www.yarisworld.com/forums/sho...22&postcount=4
__________________

|
|
|
|
|
09-25-2012, 12:35 PM
|
#7 |
|
What I thought I'd do was
Drives: 09 Yaris Sedan Join Date: Aug 2009
Location: Northwest Alabama
Posts: 1,140
|
Thanks man.
I definitely didn't depressurize the fuel system first. How much of a problem will that be?
__________________
My Nissan Hardbody (D21) 4x4 build log Check out my YouTube channel (mostly shooting) - http://www.youtube.com/user/47MasoN47 |
|
|
|
|
09-25-2012, 12:59 PM
|
#8 | |
|
ULTIMATE
Drives: 09 5dr LB, 2x 08 3dr LB Join Date: Oct 2008
Location: USA, CT
Posts: 13,460
|
Quote:
__________________
|
|
|
|
|
|
09-25-2012, 01:23 PM
|
#9 |
|
What I thought I'd do was
Drives: 09 Yaris Sedan Join Date: Aug 2009
Location: Northwest Alabama
Posts: 1,140
|
Ah ok.
BTW is this the type of wrench he was talking about when he talked about the ratcheting swivel box end wrench? http://www.sears.com/craftsman-12mm-...79000P?prdNo=2
__________________
My Nissan Hardbody (D21) 4x4 build log Check out my YouTube channel (mostly shooting) - http://www.youtube.com/user/47MasoN47 |
|
|
|
|
09-25-2012, 01:27 PM
|
#10 | |
|
ULTIMATE
Drives: 09 5dr LB, 2x 08 3dr LB Join Date: Oct 2008
Location: USA, CT
Posts: 13,460
|
Quote:
__________________
|
|
|
|
|
|
09-25-2012, 08:54 PM
|
#11 |
|
What I thought I'd do was
Drives: 09 Yaris Sedan Join Date: Aug 2009
Location: Northwest Alabama
Posts: 1,140
|
Ok, another question. How the crap does this dipstick bracket deal work? It looks to me like it's too thick to put on that L shaped bracket that holds the compressor to the manifold. I also don't see how it's supposed to mount to the OEM dipstick bracket.
__________________
My Nissan Hardbody (D21) 4x4 build log Check out my YouTube channel (mostly shooting) - http://www.youtube.com/user/47MasoN47 |
|
|
|
|
09-25-2012, 09:01 PM
|
#12 |
|
What I thought I'd do was
Drives: 09 Yaris Sedan Join Date: Aug 2009
Location: Northwest Alabama
Posts: 1,140
|
I mean, it's not load bearing or anything right? I'm considering just zip tying that bracket to an unused flange on the back end of the compressor, then zip tying the dipstick pipe to the bracket.
__________________
My Nissan Hardbody (D21) 4x4 build log Check out my YouTube channel (mostly shooting) - http://www.youtube.com/user/47MasoN47 |
|
|
|
|
09-25-2012, 09:43 PM
|
#13 | |
|
ULTIMATE
Drives: 09 5dr LB, 2x 08 3dr LB Join Date: Oct 2008
Location: USA, CT
Posts: 13,460
|
Quote:
Blitz Dip Stick.jpg
__________________
|
|
|
|
|
|
09-25-2012, 11:26 PM
|
#14 |
|
What I thought I'd do was
Drives: 09 Yaris Sedan Join Date: Aug 2009
Location: Northwest Alabama
Posts: 1,140
|
Hmm, mine wouldn't fit that way. There wasn't enough length on the bolt for it to go through the bracket, flange, and L shaped bracket. I ended up using a spare flange on the compressor, bolted the bracket to that with some stuff I had lying around, then zip tied the dipstick to the bracket.
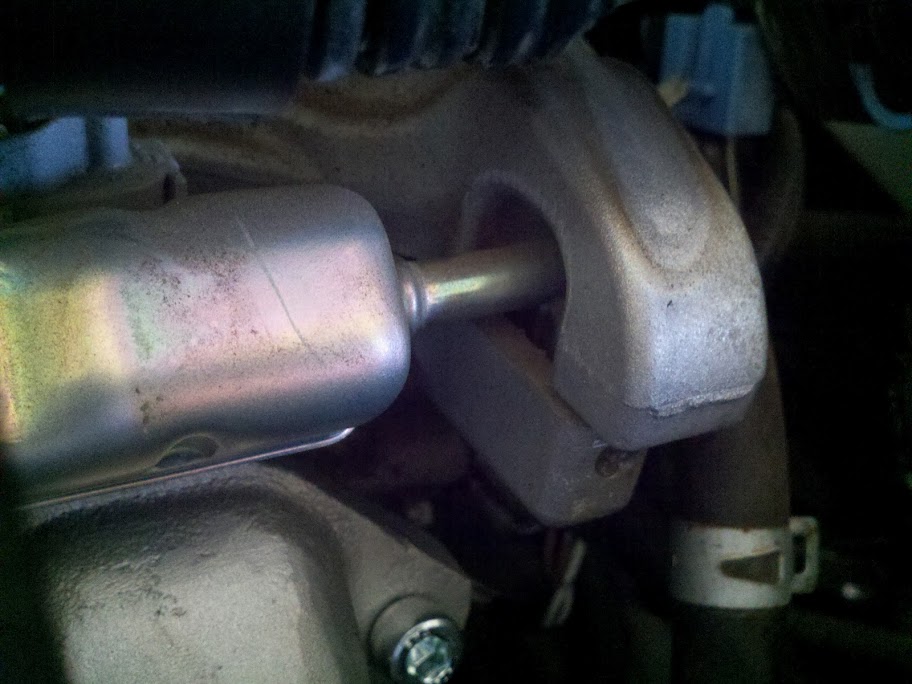
I'm now at this point where I believe I just need a longer hose to get the hose you can see in the top of the image onto the nipple at the bottom. I saw where you mentioned needing a piece of hose, so I'm guessing this is where.  This is what it currently looks like. I've noticed my top compressor tube thing has a kinda ugly weld seam that most people don't seem to have. 
__________________
My Nissan Hardbody (D21) 4x4 build log Check out my YouTube channel (mostly shooting) - http://www.youtube.com/user/47MasoN47 |
|
|
|
|
09-26-2012, 12:15 AM
|
#15 |
|
ULTIMATE Drives: 07 Yaris Turbo Join Date: May 2007
Location: Canoga Park, CA
Posts: 14,859
|
^ I'll check the extra blower we have for that tomorrow.
__________________
Micro Image forums, online store and shop are now closed. It was a great eight year run, but it was time to focus on other things. I'm still selling parts on eBay under micro*image seller ID and customers can still make requests for anything specific. |
|
|
|
|
09-26-2012, 01:30 AM
|
#16 |
|
What I thought I'd do was
Drives: 09 Yaris Sedan Join Date: Aug 2009
Location: Northwest Alabama
Posts: 1,140
|
Oh sweet, I wasn't sure if that was just how they were made now or what.
__________________
My Nissan Hardbody (D21) 4x4 build log Check out my YouTube channel (mostly shooting) - http://www.youtube.com/user/47MasoN47 |
|
|
|
|
09-26-2012, 07:54 AM
|
#17 | |
|
Drives: 06 Polar White 5dr, 13 Soul 4u Join Date: Oct 2008
Location: Georgetown, Ontario, Canada
Posts: 5,740
|
Quote:
http://www.yarisworld.com/forums/sho...9&postcount=40 Here is a link to another install where you can see the weld is as pronounced as yours. http://www.yarisworld.com/forums/sho...5&postcount=79
__________________
|
|
|
|
|
|
09-26-2012, 08:39 AM
|
#18 |

Drives: Yaris Sedan 2009 Join Date: Sep 2010
Location: Quebec
Posts: 566
|
I should have gone this route!! Tubo is much more complicated and more expensive loll
__________________
Interior:ALL red, black roof Exterior:RTX scorpion painted GOLD, side and rear visor, oem spoiler, MI mesh grill, Hella supertone horn, RS badge, Vios badge, CF pillar, Led mirror cover, fog light HID 3000k, Projector retrofit HID 8000K Performance :MI CrankPulley, Tein springs, UR and TRD bar, TURBO IN PROGRESS Audio : Pionner DEH-80PRS, HAT L1V2, PowerBass 1100.5X 5 channel amp 
|
|
|
|
 |
|
|
 Similar Threads
|
||||
| Thread | Thread Starter | Forum | Replies | Last Post |
| Compilation of Yaris How-tos/DIYs | YarisBueller | DIY / Maintenance / Service | 39 | 04-28-2018 08:47 AM |
| Yet another Blitz Supercharger Install | CTScott | DIY / Maintenance / Service | 80 | 05-09-2013 08:18 PM |
| Blitz SuperCharger Install | PETERPOOP | Forced Induction Forum | 127 | 09-23-2010 01:25 AM |
| an other blitz install thanks to Garm | s3r3nity | Forced Induction Forum | 18 | 05-13-2009 09:35 AM |
| Amp install under the passenger seat questions.. | MudBug | In Car Entertainment + Electronics (audio / video / alarm) | 19 | 06-06-2007 11:12 AM |


 Linear Mode

