
 |
 |
|
|
|
|
 06-17-2009, 09:21 PM
|
#1 |
|
Crazy Girl (Kasey)

Drives: 09 Yaris 3D; 05 R6; 00civic si Join Date: Mar 2009
Location: Orange County, CA
Posts: 383
|
DIY: Cargo Net for Hatchback Simplified [PICS]
I looked and didn't see this already on the list of DIYs, so I thought I would add it!
When you get the cargo net, it comes with instructions that makes it seem WAY more difficult than it has to be (taking out tool compartments by the spare, unscrewing/unbolting more things than necessary, etc). Which is the main reason I wanted to post pictures to show how easy it can be done. After installing cargo nets on both my hatchback and my mom's, it really takes only about 5-10 min max for actual install time. Step 1 Gather the tools you need and the cargo net. 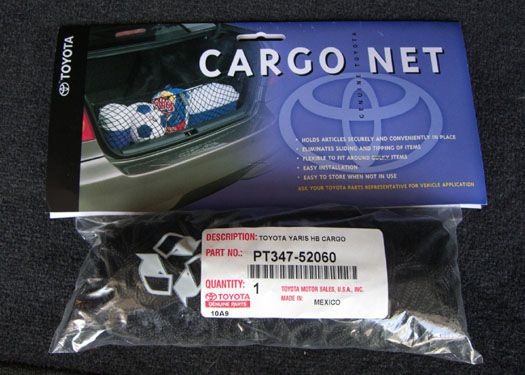 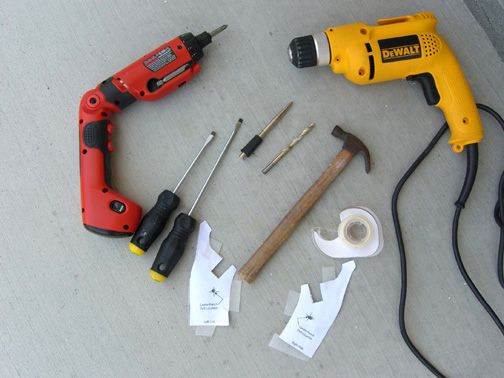 For the tools, I used: Template (from packaged instructions) & tape A center punch/hammer combination just to start a spot for drilling Drill and a 15/64" or 1/4" drill bit (I used the 15/64") Phillips screwdriver (I used my electric one to make things go that much faster) Long screwdriver for prying up the panel Step 2 Tape templates to side panels. 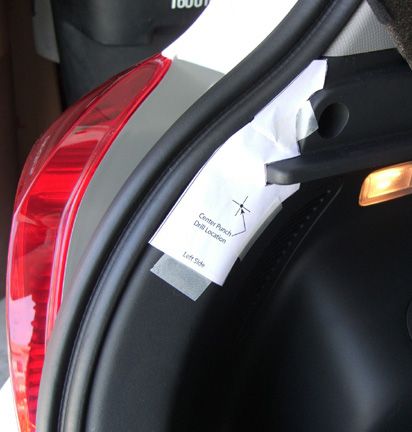 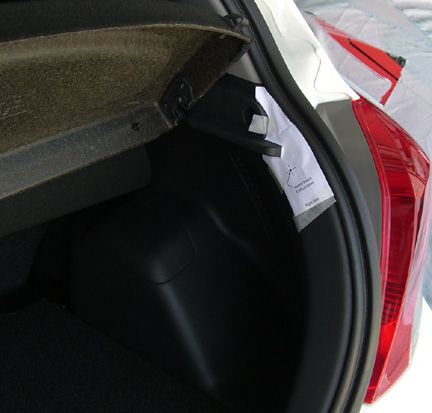 Step 3 Center punch (optional - to ensure accuracy) & Drill! Repeat for both sides. 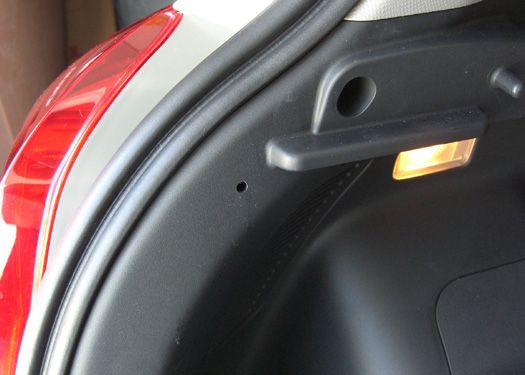 Step 4 Remove the phillips head screw from the side panel, next to where you drilled. Repeat for both sides. 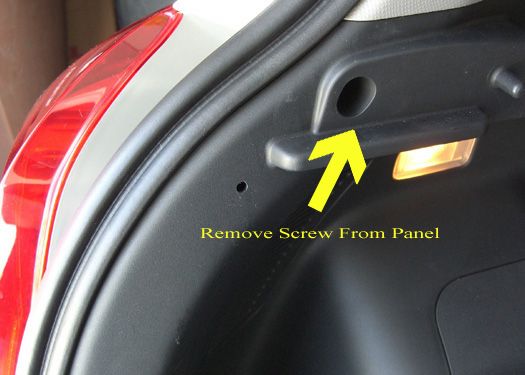 Step 5 Take the screw/hook that came with the net and install screw portion behind panel. This requires using the long flat head screwdriver to pry the side panel to where you can pull it enough to get your fingers behind (with the screw). Be careful not to drop the screw!! 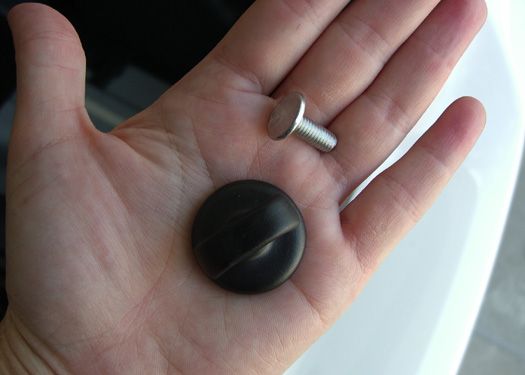 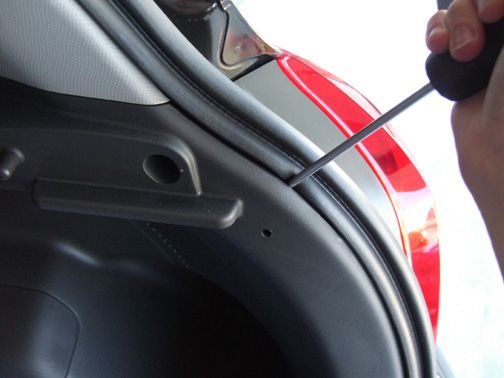 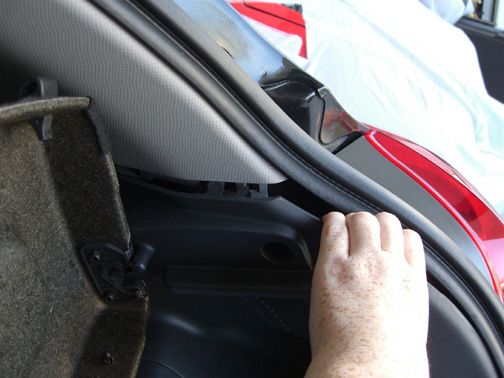  Step 6 Screw on hook component to screw. Be sure to keep pressure on the back of the screw as you do this, to make sure it's on tight. Repeat steps 5 & 6 for both sides. 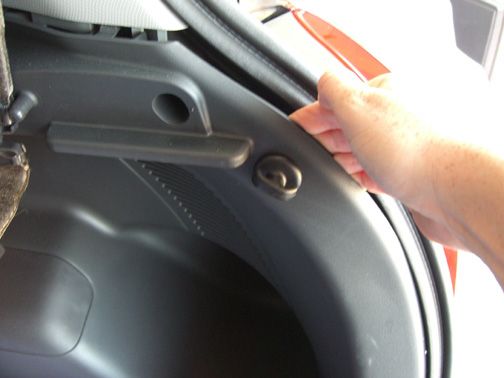 Step 7 Push/snap side panel back in place. Screw in phillips head screw that you removed in step 4. Step 8 Put cargo net on hooks! 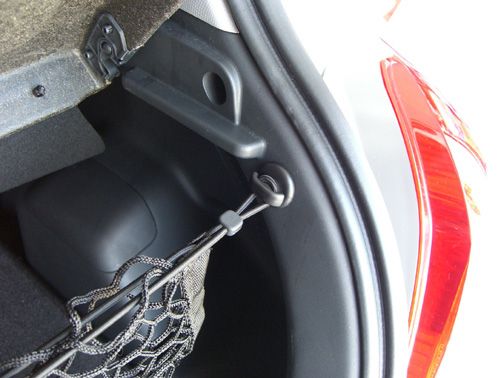 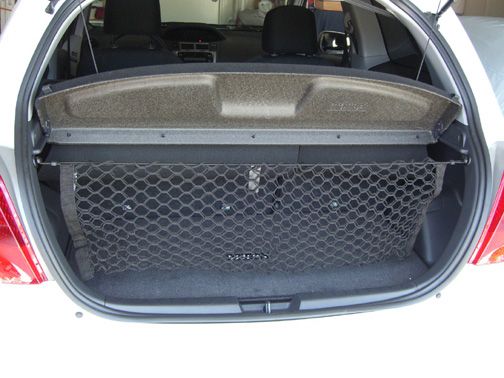
|

|

|
|
06-17-2009, 09:47 PM
|
#2 |
|
super duper M*******TOR

Drives: 2007 jahPANIS egg(Sarao Phil) Join Date: Oct 2008
Location: Torrance, Ca
Posts: 1,011
|
great job!
|
|
|
|
|
06-18-2009, 09:41 AM
|
#3 |
  Drives: Toyota/Scion Join Date: Jun 2006
Location: Myrtle Beach, SC
Posts: 156
|
Nice instructions! Great write up!
Tim |
|
|
|
|
06-18-2009, 03:24 PM
|
#4 |
|
Learn to Relax
Drives: 2007, Meteorite, LB Join Date: Dec 2008
Location: Anaheim, CA
Posts: 2,070
|
Good job!

|
|
|
|
|
01-03-2010, 01:29 AM
|
#5 |

Drives: '09 Yaris carmine red 2d HB Join Date: Jun 2009
Location: Middletown, NY
Posts: 1,502
|
I just got my cargo net in the mail, read the instuctiions and was like WTF?.........
As stated, it makes it seem way too contrived. This make it much easier!
|
|
|
|
|
01-03-2010, 12:28 PM
|
#6 | |

Drives: 07 Yaris 3dr LB (Bayou Blue) Join Date: Oct 2008
Location: Raleigh, NC
Posts: 2,602
  |
where does the bottom bit connect to, im confused? lol
__________________
-Jen <3  Quote:

|
|
|
|
|
|
01-03-2010, 12:56 PM
|
#7 | |

Drives: '08 LB MT Bayou Join Date: Oct 2008
Location: Colorado
Posts: 1,671
|
Quote:
|
|
|
|
|
|
01-03-2010, 01:20 PM
|
#8 | |
|
Drives: 07 Yaris 3dr LB (Bayou Blue) Join Date: Oct 2008
Location: Raleigh, NC
Posts: 2,602
|
ohhh! That makes even more sense.... I didnt see the point of it before.... neat.... stuff is always rolling around in the back of my hatch... I hold shopping bags together with a bungee wrapped from around the headrests.
:)
__________________
-Jen <3 Quote:
|
|
|
|
|
|
03-24-2010, 12:26 PM
|
#9 |
|
Drives: '09 Yaris carmine red 2d HB Join Date: Jun 2009
Location: Middletown, NY
Posts: 1,502
|
I finally installed my cargo net last weekend. I waited until warmer weather as I do not have a garage.
Anyway, it took me all of 10 minutes since I was in absolulty no hurry. BTW, If anyone is thinking about getting one, I also have a cargo net in my other Toyota and they are definately handy/worth while and they are instantly removable. 
|
|
|
|
|
03-24-2010, 04:45 PM
|
#10 |
|
Drives: 2009 Yaris Onyx Join Date: Dec 2009
Location: Alabama
Posts: 201
|
Nice write up, one question and one suggestion. Question, what's the cost of the net? Suggestion, what about putting a drop Loctite on the threads of the screw to help prevent it from coming loose?
Later, Al |
|
|
|
|
07-14-2010, 09:47 AM
|
#11 | |
|
Crazy Girl (Kasey)
Drives: 09 Yaris 3D; 05 R6; 00civic si Join Date: Mar 2009
Location: Orange County, CA
Posts: 383
|
Quote:
The loctite is a great idea since the screws need a little tightening once in a while if you put the net up & down a lot. |
|
|
|
|
|
08-11-2010, 03:12 AM
|
#12 |
|
Drives: '08 Blazing Blue Yaris LB Join Date: Sep 2009
Location: USA
Posts: 496
|
I love my net! Nice pictorial.
|
|
|
|
|
02-18-2012, 02:52 PM
|
#13 |
|
Drives: 2008 Yaris #D Liftback Red Join Date: Feb 2012
Location: Raleigh NC
Posts: 3
|
Thanks a lot... The installation instruction was very helpful.
I bought the net from eBay for $15. Unfortunately it did not come with Hardware kit. A friend of mine at the Toyota Dealership identified the hardware kit as part# PT347-35991-HK ($4.27 with tax) . Even though the packaging says 4-Runner Hardware Kit it is identical and perfectly fits. The installation was piece of cake (less than 10 minutes). One caution though. If you drop the screw you are screwed... I tied it with a piece of string in case it gets dropped between the panel. Good luck Last edited by MrMatt; 02-21-2012 at 11:56 AM. |
|
|
|
|
04-22-2020, 11:11 AM
|
#14 |
|
Super Moderator

Drives: 2014 White VITZ Join Date: May 2007
Location: Huntington Bch, CA
Posts: 4,938
|
Reviving this really old thread!
A cargo net is great idea for some of us, and for less than $15 you can easily install one in your car using these easy to follow DIY instructions. |
|
|
|
 |
|
|
 Similar Threads
|
||||
| Thread | Thread Starter | Forum | Replies | Last Post |
| DIY - rear sway bar [pics] | cali yaris | DIY / Maintenance / Service | 199 | 07-28-2022 05:25 AM |
| Yaris sedan Cargo Net | chino.estacio | Cosmetic Modifications (Exterior/Interior) | 6 | 02-07-2009 12:40 PM |
| How to put in my 'own' cargo net? | fantabulousbaby | General Yaris / Vitz Discussion | 22 | 01-08-2007 03:54 PM |
| Liftback - Cargo Net | Pompeii66 | General Yaris / Vitz Discussion | 22 | 09-04-2006 04:16 PM |


 Hybrid Mode
