
 |
 |
|
|
|
|
 03-13-2009, 09:40 PM
|
#1 |
  
Drives: '14 GT86, '08 Vitz Join Date: Dec 2006
Location: Central Valley, CA
Posts: 9,873
|
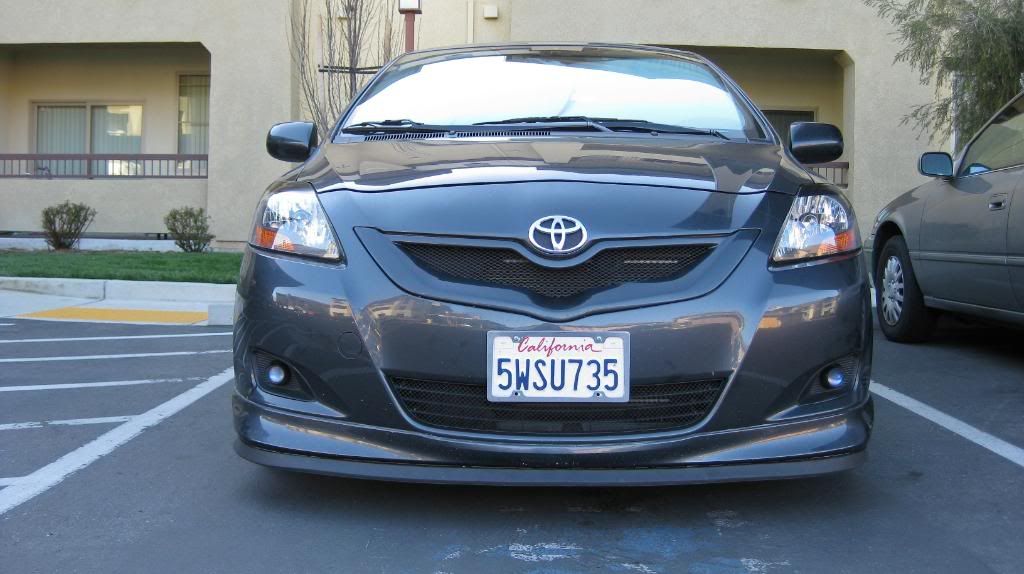
A Few New Pics
Can you spot what's new
 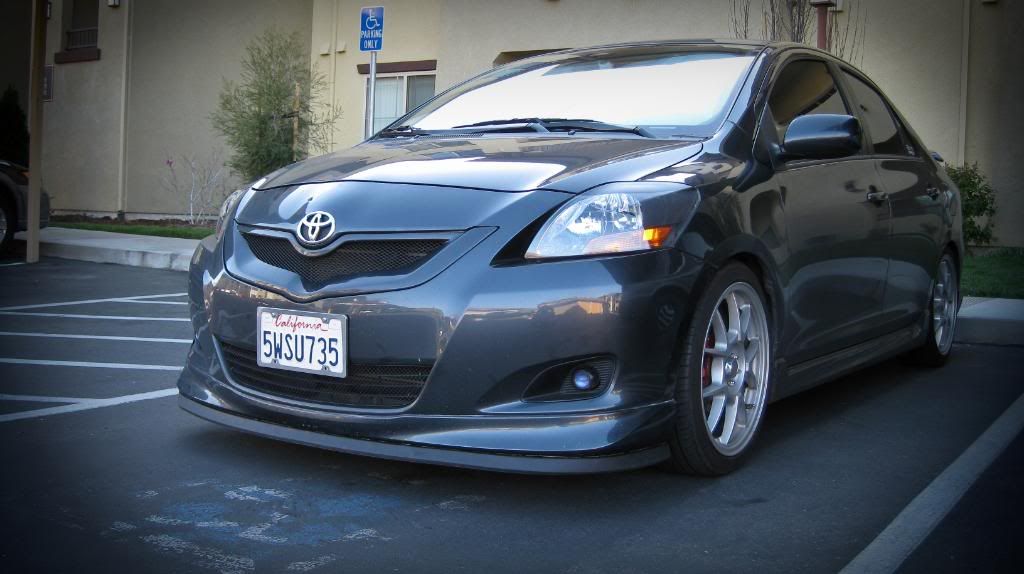  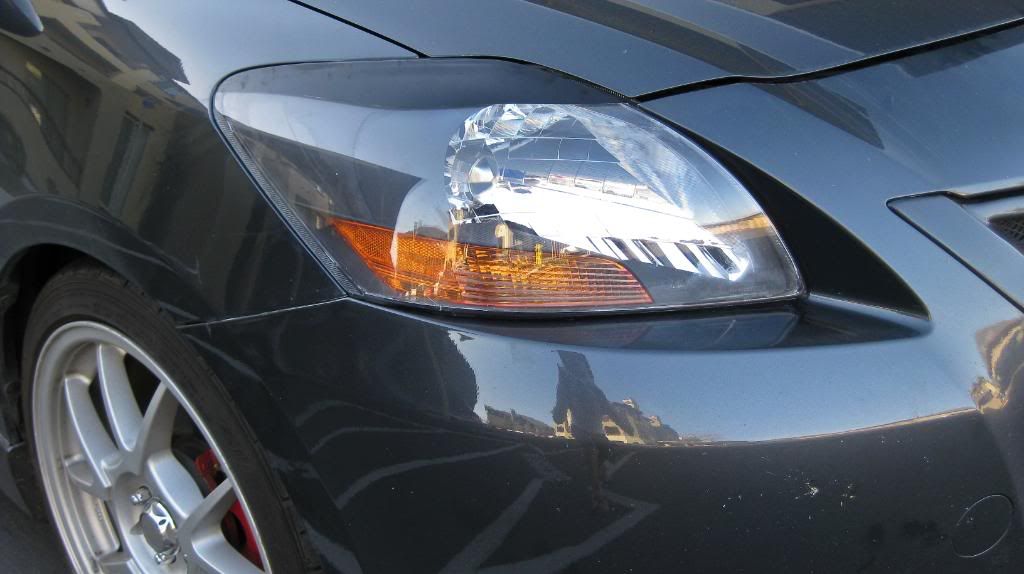  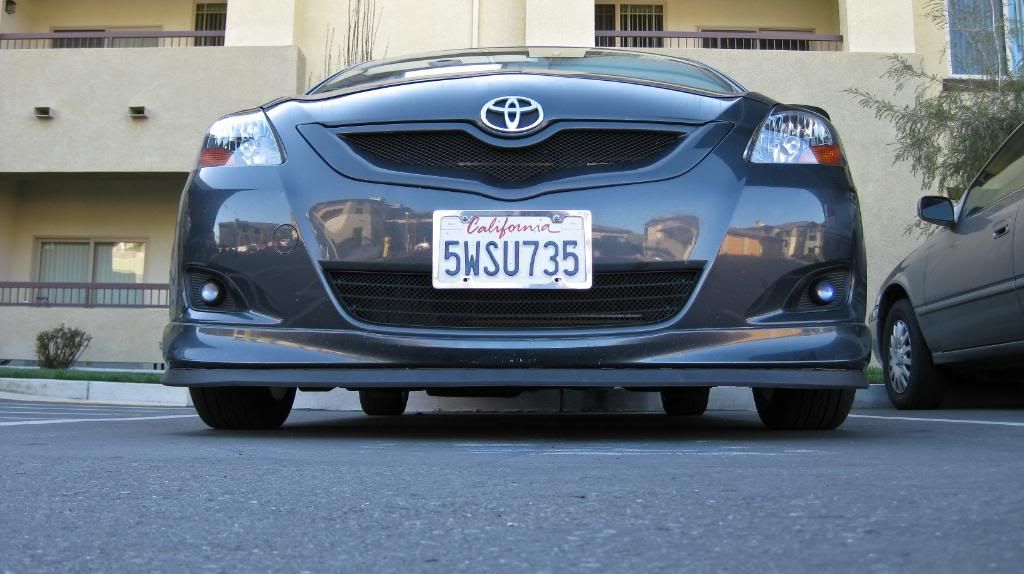 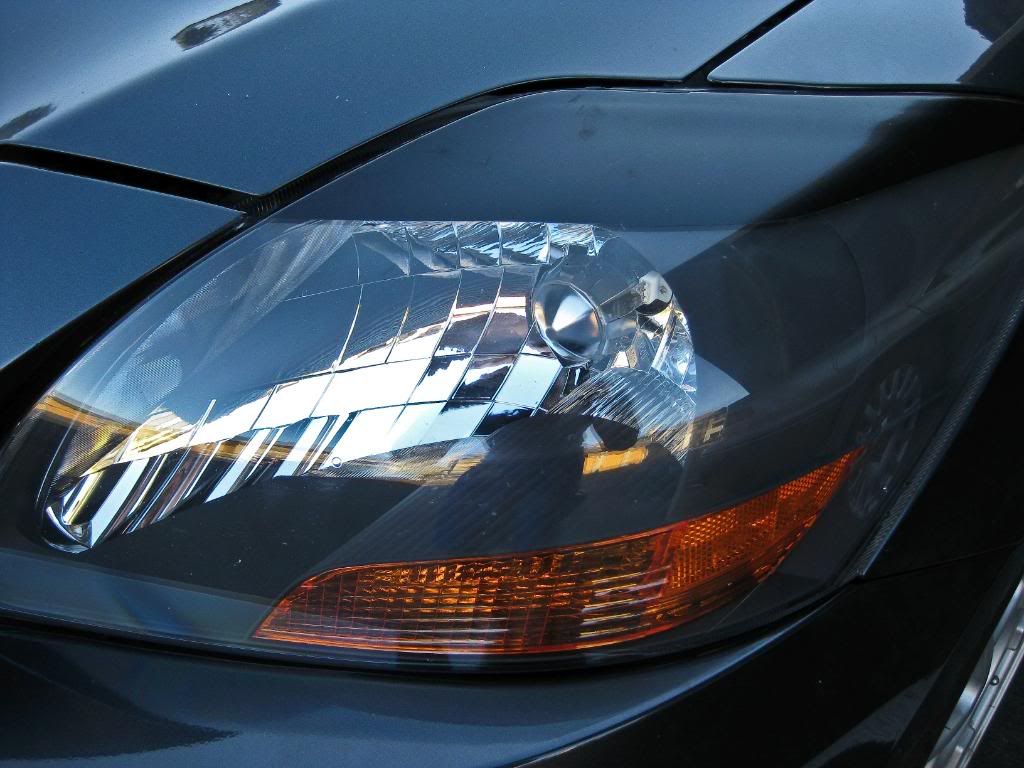 Yeah, the condensation problem I had really did a number on the headlight cover  . .
|

|

|
|
03-13-2009, 09:48 PM
|
#2 |

Drives: 2007 Yaris S Join Date: Jan 2009
Location: Virginia Beach
Posts: 320
|
for a second there i thought you had projectors/halos :D
but word how much did it cost to get your headlights, i assume painted is the right word, like that?
__________________
Project LEGATO 
|
|
|
|
|
03-13-2009, 09:58 PM
|
#3 | |
|
Drives: '14 GT86, '08 Vitz Join Date: Dec 2006
Location: Central Valley, CA
Posts: 9,873
|
Quote:
The high temp flat black paint and some silicone sealant only cost like 8-9 bucks.  Thanks to the person who made the DIY guide here. I used it as a reference, but instead of a hairdryer, I used an oven. Baked the headlights at 255 degrees for 8 minute intervals until I was able to take the cover and headlight apart. |
|
|
|
|
|
03-13-2009, 09:53 PM
|
#4 |
|
Drives: Copper Orange Mica Yaris Join Date: Feb 2006
Location: Surrey, BC
Posts: 503
|
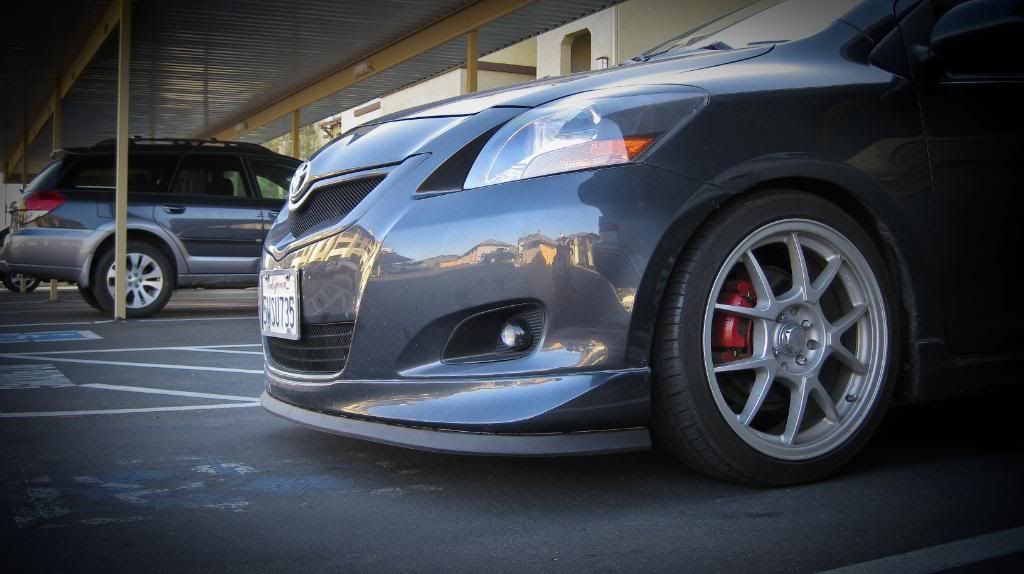
I love your new front lip splitter KL !!
I am not sure is your fog light looks like this before, but it looks great !!!!
__________________
 My Copper Orange Mica Yaris with 9.3lb Kosei K1 TS http://www.yarisworld.com/forums/showthread.php?t=10951 http://www.yarisworld.com/forums/showthread.php?t=13882 http://www.yarisworld.com/forums/sho...180#post472180 |
|
|
|
|
03-13-2009, 10:01 PM
|
#5 | |
|
Drives: '14 GT86, '08 Vitz Join Date: Dec 2006
Location: Central Valley, CA
Posts: 9,873
|
Quote:
I also painted the top mesh flat black as well.
|
|
|
|
|
|
03-13-2009, 10:03 PM
|
#6 |
|
Drives: '14 GT86, '08 Vitz Join Date: Dec 2006
Location: Central Valley, CA
Posts: 9,873
|
hehe, before anyone says anything, I'm not parked in a handicap parking. It's been changed to a regular spot. The spot across the has marks is the handicap spot now.
|
|
|
|
|
03-13-2009, 11:19 PM
|
#7 |
|
Mr. Clean

|
A lip on a lip! Slightly off topic, but I really like the way those wheels look on your car. There was a set of those for sale over here but I didn't like the bronze color. The silver looks much better.
|
|
|
|
|
03-14-2009, 12:01 AM
|
#8 | |
|
Drives: '14 GT86, '08 Vitz Join Date: Dec 2006
Location: Central Valley, CA
Posts: 9,873
|
Quote:
|
|
|
|
|
|
03-14-2009, 12:14 AM
|
#9 | |

|
Quote:
But sadly even is i had gotten the Yaris S, they dont come with lip kit in PR  only spoiler and rims only spoiler and rimsWhere did you get the Lips Lip? lol
__________________
  The difference between fiction and reality? Fiction has to make sense. --Tom Clancy |
|
|
|
|
|
03-14-2009, 12:16 AM
|
#10 | |
|
Drives: '14 GT86, '08 Vitz Join Date: Dec 2006
Location: Central Valley, CA
Posts: 9,873
|
Quote:
|
|
|
|
|
|
03-14-2009, 12:58 AM
|
#11 |
|
Drives: Copper Orange Mica Yaris Join Date: Feb 2006
Location: Surrey, BC
Posts: 503
|
It makes your front end even lower and no worry for it to break, haha. For only $15, that is bang on the bucks.
__________________
My Copper Orange Mica Yaris with 9.3lb Kosei K1 TS http://www.yarisworld.com/forums/showthread.php?t=10951 http://www.yarisworld.com/forums/showthread.php?t=13882 http://www.yarisworld.com/forums/sho...180#post472180 |
|
|
|
|
03-14-2009, 01:53 AM
|
#12 | |
|
Drives: '14 GT86, '08 Vitz Join Date: Dec 2006
Location: Central Valley, CA
Posts: 9,873
|
Quote:
|
|
|
|
|
|
03-14-2009, 02:02 AM
|
#13 |
|
vroom vroom

Drives: lil red 5-door Join Date: Sep 2006
Location: Bangkok, Thailand
Posts: 7,744
    |
looking good there! I gotta find some of that door sealant too... how did you attach it? double-sided body tape?
__________________
The price of freedom of religion, or of speech, or of the press, is that we must put up with a good deal of rubbish. - Robert Jackson  Bye bye 1NZ... |
|
|
|
|
03-14-2009, 02:57 AM
|
#14 | |
|
Drives: '14 GT86, '08 Vitz Join Date: Dec 2006
Location: Central Valley, CA
Posts: 9,873
|
Quote:
|
|
|
|
|
|
03-14-2009, 02:57 AM
|
#15 |
|
Drives: '14 GT86, '08 Vitz Join Date: Dec 2006
Location: Central Valley, CA
Posts: 9,873
|
So, breakdown and synopsis of HP Special Lip
 : :Tools required: -drill -at least 32 self tapping screws and washers -outdoor double-sided tape -jack and jack stands -ratchet and proper sockets (I remember using a 10, but I think I used something else, can't remember if it was for the bumper or for the headlights. I did both mods at the same time). Steps: 1. Jack up the car so that you can gain access to the bottom bolts easily. 2. Remove top "suicide screws" (the black things that I have no clue what they're called). 3. Remove the single bolts at the end of the bumper in the wheel arch. 4. Remove bottom bolts. 5. Pop out the sides of the front bumper. 6. Take out bumper. 7. Remove foglight if applicable. 8. Wash the bottom of the bumper or lip. 9. Apply said double-sided tape to the bottom of the bumper/lip following the curvature. I suggest trying to stay as far back from the tip as possible (hard to do with the S lip since there is not much surface area). Let cure onto bumper/lip. 10. Start applying the garage door seal (wider end to the aforementioned applied tape). 11. Can either put on the entire garage door seal on at one time, or start drilling the self tapping screws with washers in one at a time as you apply the seal onto the tape. Space out the screws 3-4 inches on the sides, and 4 inches elsewhere. *Don't go too near the "wall" side of the seal and don't screw in the screw too deep or else you'll get "bumps" or "waves" on the "lip/splitter". 12. Once everything is on the bumper and secured, put the foglights back on the bumper. 13. Put bolts/screws back in their proper places. 14. Lower the car off of the jack stands. 15. Admire. Total time: thinking it'll vary with your stamina and time of day. I did this at 2am. LOL. |
|
|
|
|
03-14-2009, 05:50 AM
|
#16 |
|
Banned

|
That lip looks hella clean Lazandro! You took your time!
__________________
DON'T LIKE ME? TAKE A SEAT WITH THE REST OF THE BITCHES WHO ARE WAITING FOR ME TO GIVE A FUCK. Sponsored by: Micro Image http://microimageonline.com |
|
|
|
|
03-14-2009, 02:38 PM
|
#17 | |
|
Drives: '14 GT86, '08 Vitz Join Date: Dec 2006
Location: Central Valley, CA
Posts: 9,873
|
Quote:

|
|
|
|
|
|
03-31-2009, 10:56 PM
|
#18 |
|
Drives: Flint Mica Sedan Join Date: Oct 2008
Location: Pittsburgh
Posts: 475
|
So you painted eyelids on to your lights? I've thought about doing this instead of spending 60 bucks on them or getting a type of vinyl/something that will hold up.
|
|
|
|
 |
|
|
 Similar Threads
|
||||
| Thread | Thread Starter | Forum | Replies | Last Post |
| My Belta, all the way from Pakistan! *many pics/ "mods"* | drbilal | Photo-Video-Media Gallery | 38 | 05-23-2009 01:43 AM |
| TRD spring install pics | tristan | Photo-Video-Media Gallery | 10 | 02-20-2009 11:33 PM |
| Finally, Some New Pics of My Vios | Kaotic Lazagna | Photo-Video-Media Gallery | 35 | 01-15-2009 03:57 AM |
| sparco seats and pedals (pics) | turboyaris | Cosmetic Modifications (Exterior/Interior) | 18 | 09-05-2007 03:43 AM |
| Deals Gap pics | HTM Yaris | Photo-Video-Media Gallery | 3 | 05-15-2007 07:02 PM |


 Hybrid Mode
