

 |
 |
|
|
|
|
 05-13-2009, 04:31 PM |
#1 |
 ULTIMATE 
Drives: 09 5dr LB, 2x 08 3dr LB Join Date: Oct 2008
Location: USA, CT
Posts: 13,450
|
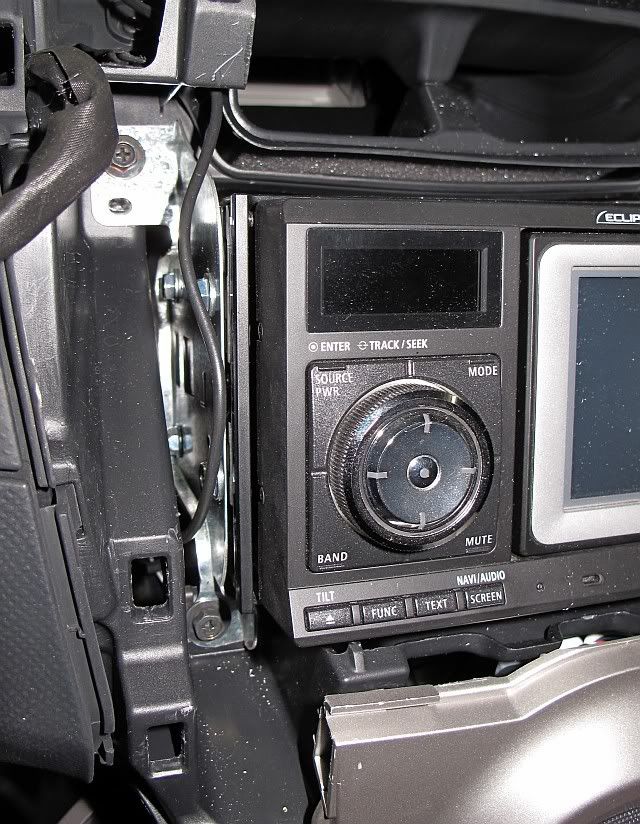
I just popped mine off to take some measurements. My Eclipse AVN2210p (which is actually the radio that Toyota made this piece because of) has a wider trim ring, which is about 1" in from the face. You can see it in the picture below. The wider ring is 179mm x 97mm. The narrower section is 170mm x 94mm.
 The new trim piece's opening is 174mm x 100mm (6 7/8" x 3 15/16"). This is 6mm narrower than Double DIN spec, which probably explains why some HU's fit without a problem and others don't. Also, the lip of the new trim piece extends 10mm deeper than the original did (see the pic below). 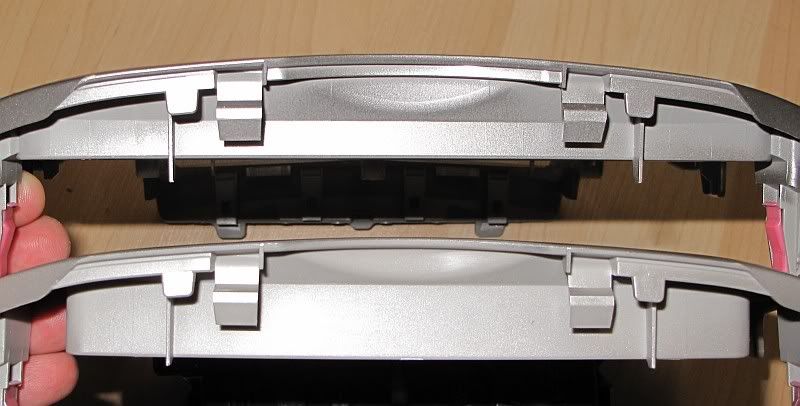
|

|
|
05-13-2009, 05:07 PM
|
#2 |
 
Drives: Polar White - 5 Door '09 LB Join Date: Aug 2006
Location: Las Vegas, NV
Posts: 1,285
|
Thanks Scott. Keep me on the list. I'll try taking pics. later. I just find it a PITA to remove the trim pieces and panels to take the HU out.
|
|
|
|
05-13-2009, 05:19 PM
|
#3 | |
|
ULTIMATE
Drives: 09 5dr LB, 2x 08 3dr LB Join Date: Oct 2008
Location: USA, CT
Posts: 13,450
|
Quote:
|
|
|
|
|
05-13-2009, 06:03 PM
|
#4 |

|
scott add me to the list too, its time for me to start getting a system.
|
|
|
|
05-13-2009, 06:13 PM
|
#5 |

Drives: 06 5dr LE (deceased), 13 Soul Join Date: Oct 2008
Location: Georgetown, Ontario, Canada
Posts: 5,828
|
It has arrived in Canada!
Will try to install tomorrow night. HU will be JVC.
__________________

|
|
|
|
05-14-2009, 04:25 AM
|
#6 |
|
Drives: Polar White - 5 Door '09 LB Join Date: Aug 2006
Location: Las Vegas, NV
Posts: 1,285
|
I tried trimming all around the back of the trim piece. Trimmed all the way to the line on the surface where you can see where the plastic was "joined" together.
Still no go. This is the best pic. I could take of it. It's like this on both sides:  I do plan on getting the new version of the P8000BT later this year. They've released new versions of most of their 2008 models already. Hopefully, they don't add the stupid faceplate on the new model. I do still want another of these DD trim pieces Scott so keep me on the list. Last edited by IsLNdbOi; 05-14-2009 at 04:54 AM. |
|
|
|
05-14-2009, 10:42 AM
|
#7 | |
|
ULTIMATE
Drives: 09 5dr LB, 2x 08 3dr LB Join Date: Oct 2008
Location: USA, CT
Posts: 13,450
|
Quote:
If I understand correctly, you're trimming the lip of the trim piece to make it less deep? If that is the case, how close is it depth-wise from the trim piece being able to snap on? Also, if you were able to move the HU in deeper (by re-drilling the bracket mounting holes), would that help? |
|
|
|
|
05-14-2009, 04:53 PM
|
#8 | ||
|
Drives: Polar White - 5 Door '09 LB Join Date: Aug 2006
Location: Las Vegas, NV
Posts: 1,285
|
Quote:
Quote:
|
||
|
|
|
05-14-2009, 06:48 PM
|
#9 |
|
Drives: 06 5dr LE (deceased), 13 Soul Join Date: Oct 2008
Location: Georgetown, Ontario, Canada
Posts: 5,828
|
SHIT!!
It's not going to work without some jigging. Going to have to shave about a quarter of an inch off of the sides of the HU opening in the trim panel.
__________________
|
|
|
|
05-14-2009, 07:47 PM
|
#10 | |
|
ULTIMATE
Drives: 09 5dr LB, 2x 08 3dr LB Join Date: Oct 2008
Location: USA, CT
Posts: 13,450
|
Quote:
|
|
|
|
|
05-14-2009, 07:52 PM
|
#11 | |
|
Drives: 06 5dr LE (deceased), 13 Soul Join Date: Oct 2008
Location: Georgetown, Ontario, Canada
Posts: 5,828
|
Quote:
__________________
|
|
|
|
|
05-14-2009, 08:06 PM
|
#12 | |
|
ULTIMATE
Drives: 09 5dr LB, 2x 08 3dr LB Join Date: Oct 2008
Location: USA, CT
Posts: 13,450
|
Quote:
Looking at an unmounted picture of your KW-XG700, it has a similar lip to IsLNdbOi's Pioneer. Does the narrower part beyond that lip fit through the opening, or is that the area that needs to be trimmed for? |
|
|
|
|
05-15-2009, 12:31 AM
|
#13 |
|
Drives: Polar White - 5 Door '09 LB Join Date: Aug 2006
Location: Las Vegas, NV
Posts: 1,285
|
The manual for the P8000BT shows this for the dimensions:
Dimensions (W × H × D): D Chassis ..................... 178 mm × 100 mm × 160 mm (7 in.× 3-7/8 in.× 6-1/4 in.) Nose ........................... 170 mm × 94 mm × 8 mm (6-3/4 in.× 3-3/4 in.× 3/8 in.) I couldn't get the P8000BT in even through the front of the new trim piece. |
|
|
|
05-18-2009, 01:28 PM
|
#14 |
|
Reluctantly Crouched...

Drives: 2008 Yaris HB M/T Join Date: Oct 2008
Location: DFW, TX
Posts: 867
|
pm sent
|
|
|
|
05-15-2009, 06:17 PM
|
#15 |
|
Drives: 06 5dr LE (deceased), 13 Soul Join Date: Oct 2008
Location: Georgetown, Ontario, Canada
Posts: 5,828
|
...and it's in...
Ground off the positioning pins on the HU mounting brackets. Was then able to position HU further back.
__________________
|
|
|
|
05-21-2009, 02:40 AM
|
#16 | |
|
Drives: Polar White - 5 Door '09 LB Join Date: Aug 2006
Location: Las Vegas, NV
Posts: 1,285
|
Quote:
If possible, can you post pictures of your modified mounting brackets? Which of the positioning dimples did you grind off on each bracket? So the new trim piece doesn't rest on the face frame of your head unit? If not, don't you see a gap / empty space around the face frame of your head unit (between the face frame and the trim piece)? |
|
|
|
|
05-21-2009, 07:21 AM
|
#17 | |
|
Drives: 06 5dr LE (deceased), 13 Soul Join Date: Oct 2008
Location: Georgetown, Ontario, Canada
Posts: 5,828
|
Quote:
If possible, can you take and post up a picture of the side of your HU, as well as one of the mounting bracket. I will then use those to show you what I did. The trim piece does rest on the HU. When the trim reaches the point where it snaps into place, the back side of the opening just meets up with the 'flange' on the face frame.
__________________
|
|
|
|
|
05-21-2009, 07:46 AM
|
#18 | |
|
ULTIMATE
Drives: 09 5dr LB, 2x 08 3dr LB Join Date: Oct 2008
Location: USA, CT
Posts: 13,450
|
Quote:
Here's a picture of the left bracket. You can see the six alignment bumps. Radio Bracket.jpg |
|
|
|
 |
|
|
 Similar Threads |
||||
| Thread | Thread Starter | Forum | Replies | Last Post |
| Dash destroyed in electrical fire. | purpleminx | General Yaris / Vitz Discussion | 79 | 06-12-2009 03:53 PM |
| [Recovered] Group Buy for Australia #1 (Badges) | harveyjai | Australia | 9 | 12-13-2008 03:59 PM |


 Hybrid Mode

