
 |
 |
|
|
 03-14-2013, 06:45 PM
|
#1 |
 Drives: 2011 5dr 5spd LB Join Date: Aug 2009
Location: NW Burbs, IL
Posts: 15
|
Dual 8 Cargo Floor Sub Box Build
Here is documentation of a custom build of my Sub box. Props go to Nexus1155 and pennyracer since I got ideas from their designs before building mine.
I previously had two 12 inch subs in a standard box powered by a 960w rms amp. First off it was way too much for my liking. Second it wasn’t bad to remove, but enough of a pain if the dog came for a ride on a moments notice. I wanted something that would be hidden in the floor and be able to be covered up looking as stealth as possible. Also keeping the spare tire was a must! I travel too far to do without it. It was very close measurements and extremely tight quarters to make. 1/4’’ Larger in certain areas would mean I could not fit the box with the spare. I built the box out of 3/4’’ MDF and had I have chose 1/2’’ it would be a lot easier for me to work with. I didn’t want to choose that since I wanted it to be solid as possible. I tailored this box around Infinity 860w 8’’ Subwoofers. They are rated 250w RMS 1000w peak. 5-3/16’’ mounting depth 7-5/16’’ cutout diameter. Recommended Sealed enclosure Volume = 0.35 Cubic Feet. To me this sub was a perfect choice as having very little room to work with keeping the spare I needed a small volume sub, but I didn’t want to sacrifice performance going to a shallow mount sub/lower performance. The main cargo floor was traced on 3/4’’ MDF with the little cargo plastic totes placed on the on there also to get their edges traced also onto it. I traced two floors both at 3/4’’ thickness. I wanted to trace one, but had to trace two because I wanted a flush install and the only way to do so was this method. Had I have ditched the spare, I could just cut a large opening and sink it in the center like pennyracer or Nexus1155 did. Being that I kept the spare the tolerances are very snug and would not allow me to do this. So having the second board traced was the only option along with the unfortunate extra weight (although not too bad). Here are the measurements for the pieces of wood I cut that assembled the chamber portion. 2 QTY 16-1/2’’ X 8-13/16’’ 2 QTY 8-13/16’’ X 5-1/4’’ 4 QTY 15-3/4’’ X 5-1/4’’ (originally had ideas for a 2 QTY 16-1/2’’ X 5-1/4’’ for a little extra support that would pertrude on the sides however due to the box needing to be set back a little bit towards the back to clear some base bracket from the back seat the box didn’t need extra support so I lopped off 3/4’’ from it thus being the same dimensions for box side of each chamber 2 per box.) 2 QTY 7-5/16’’ X 5-1/4’’ 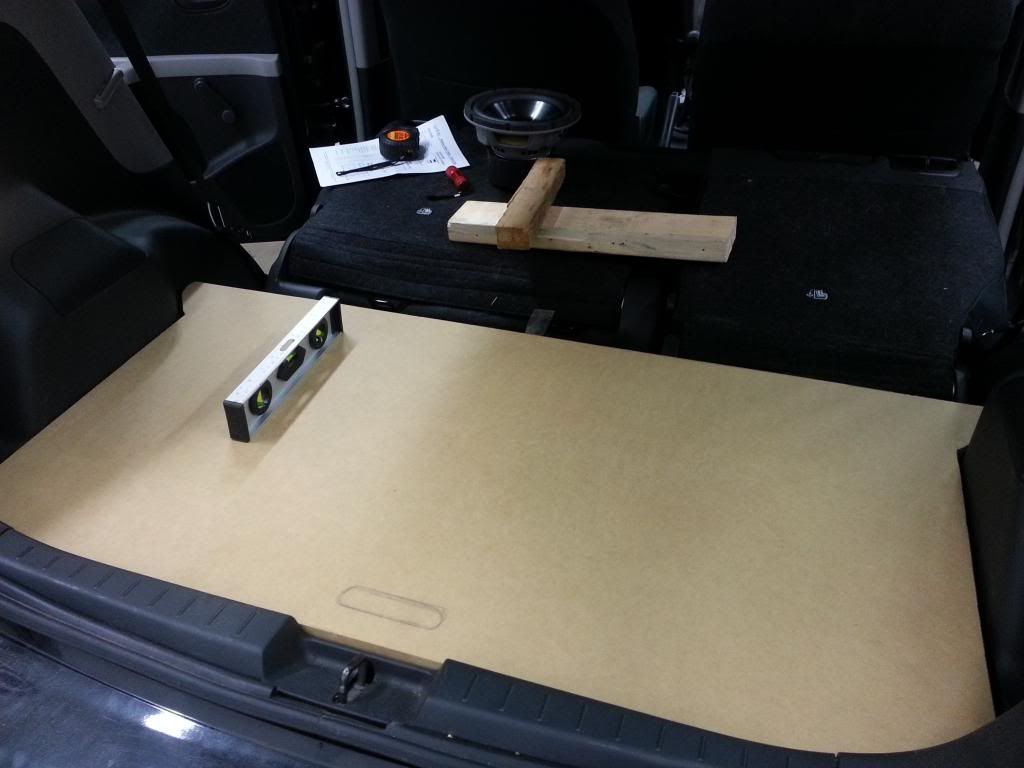 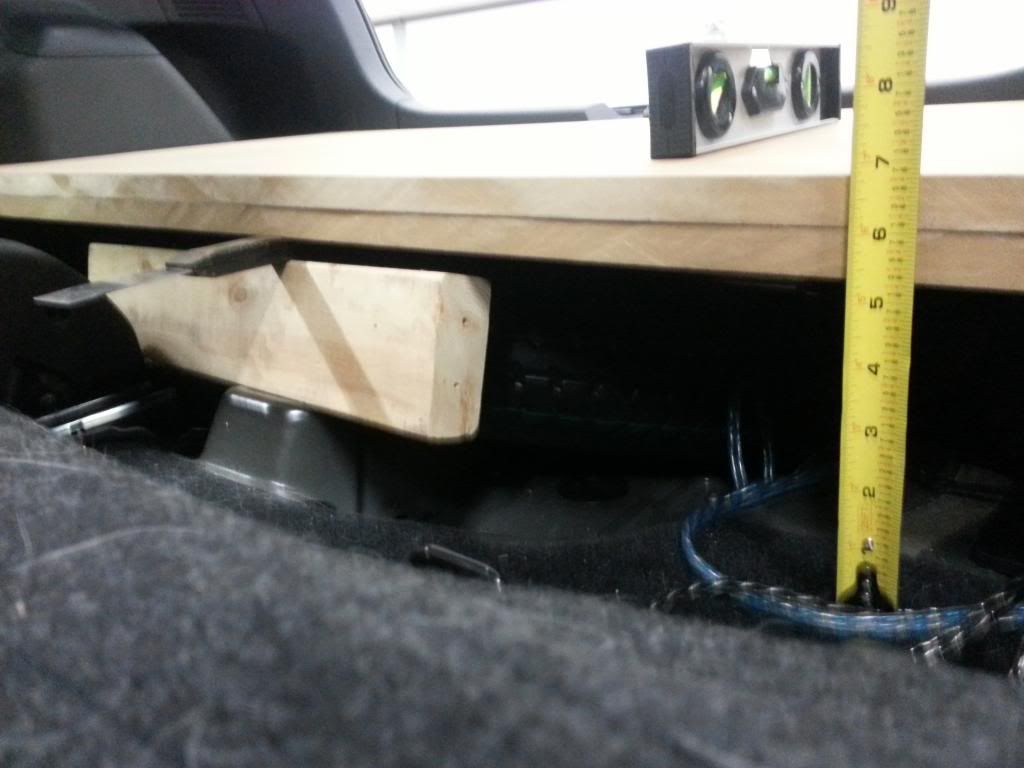 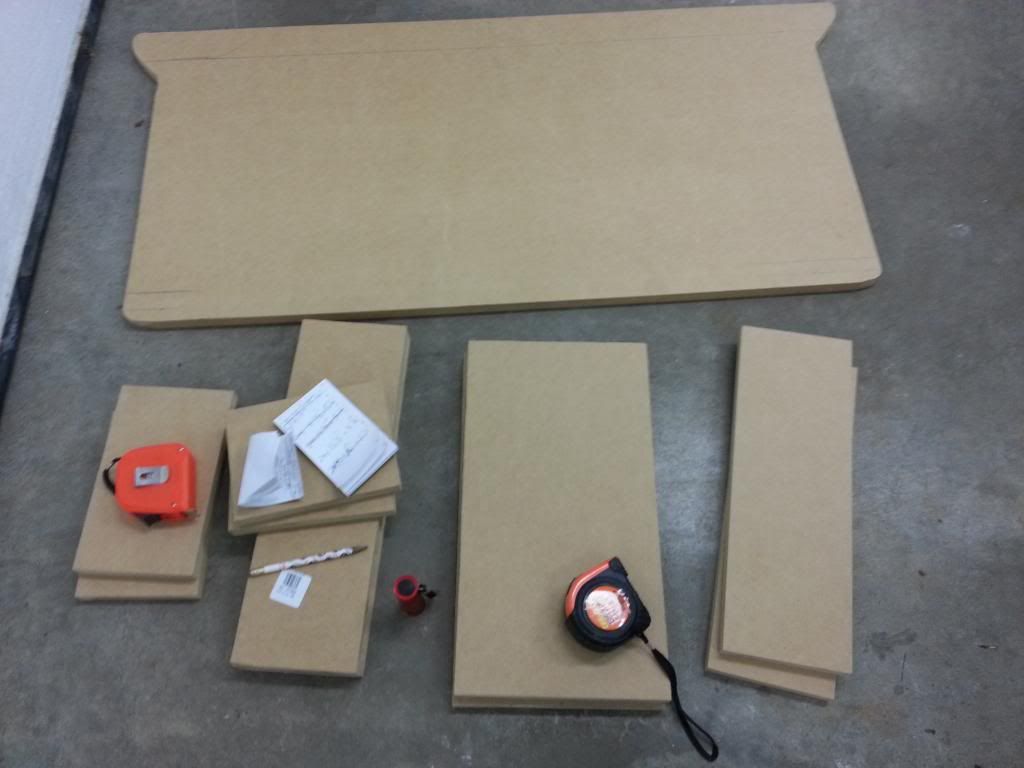 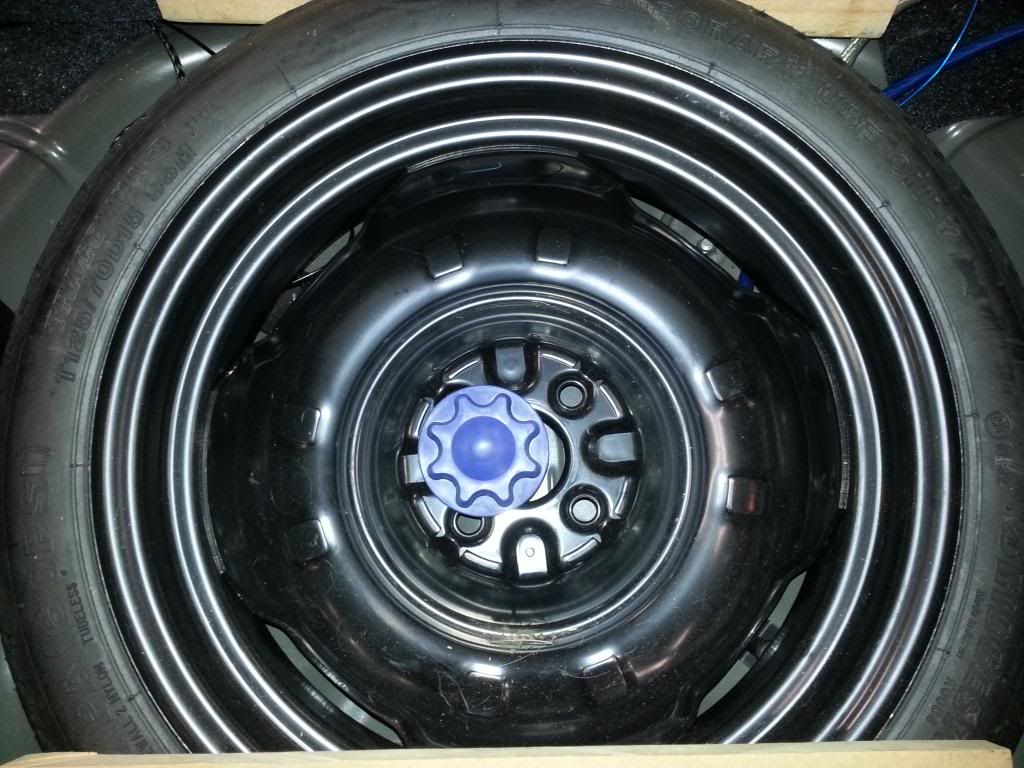 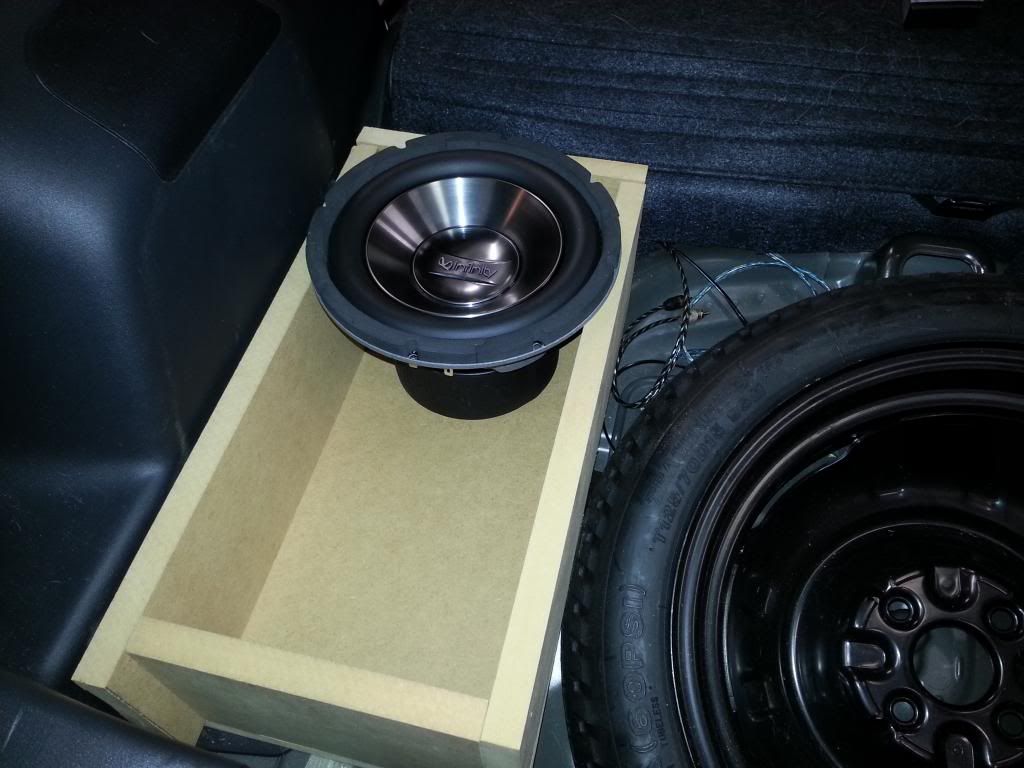 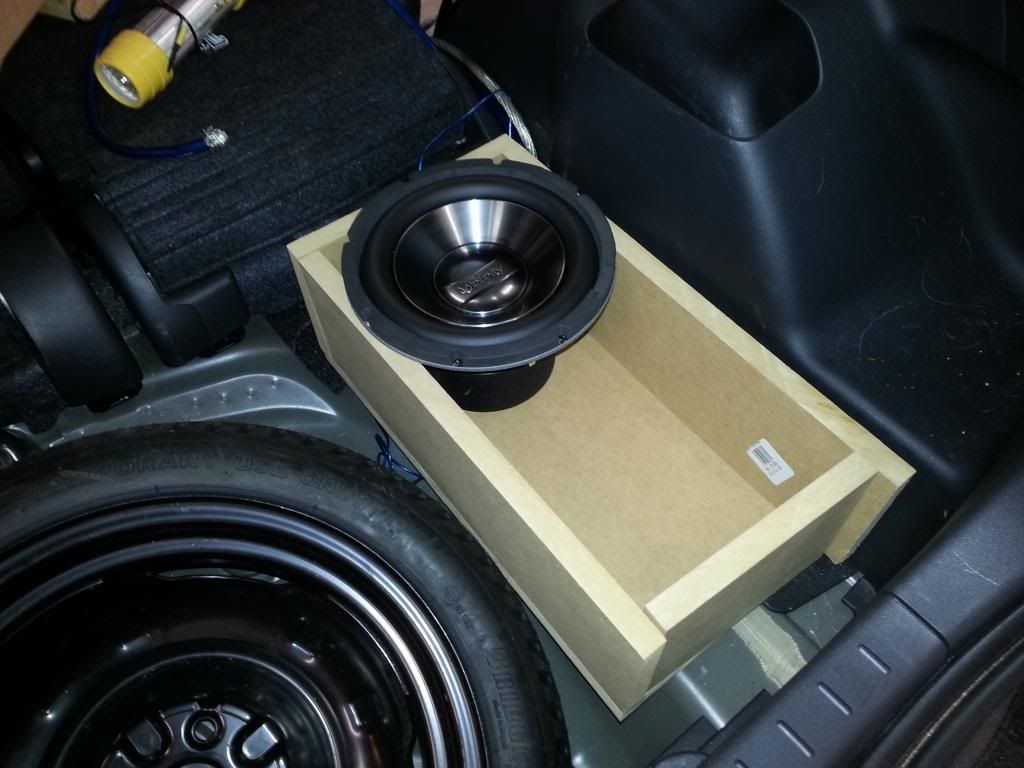 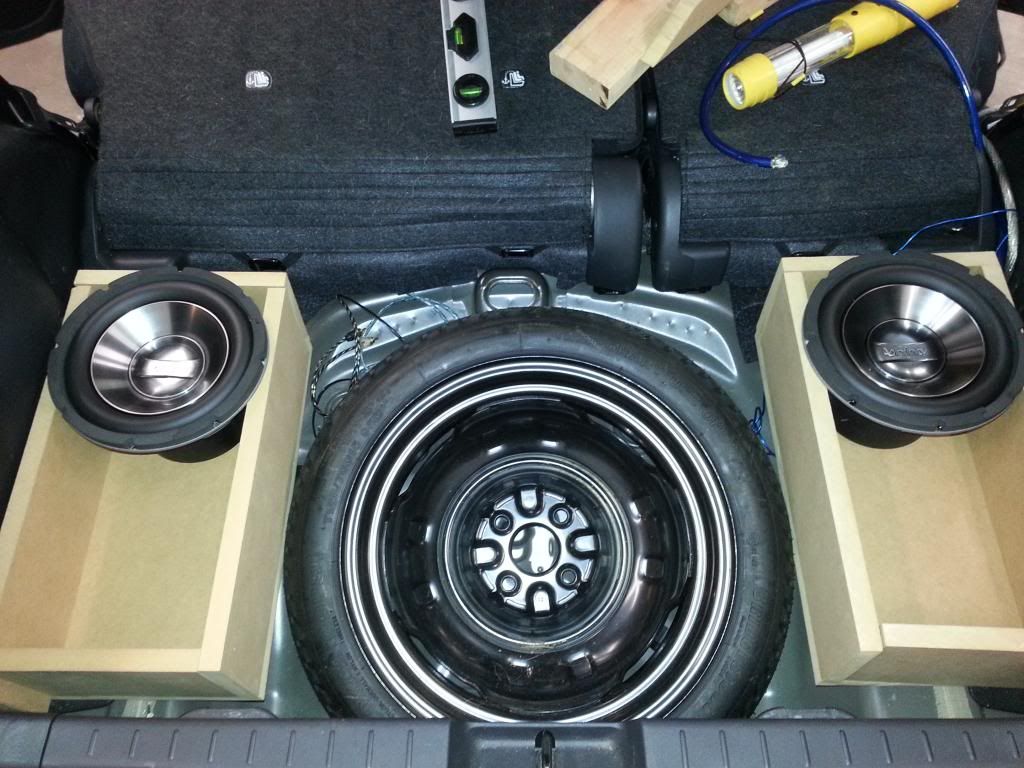 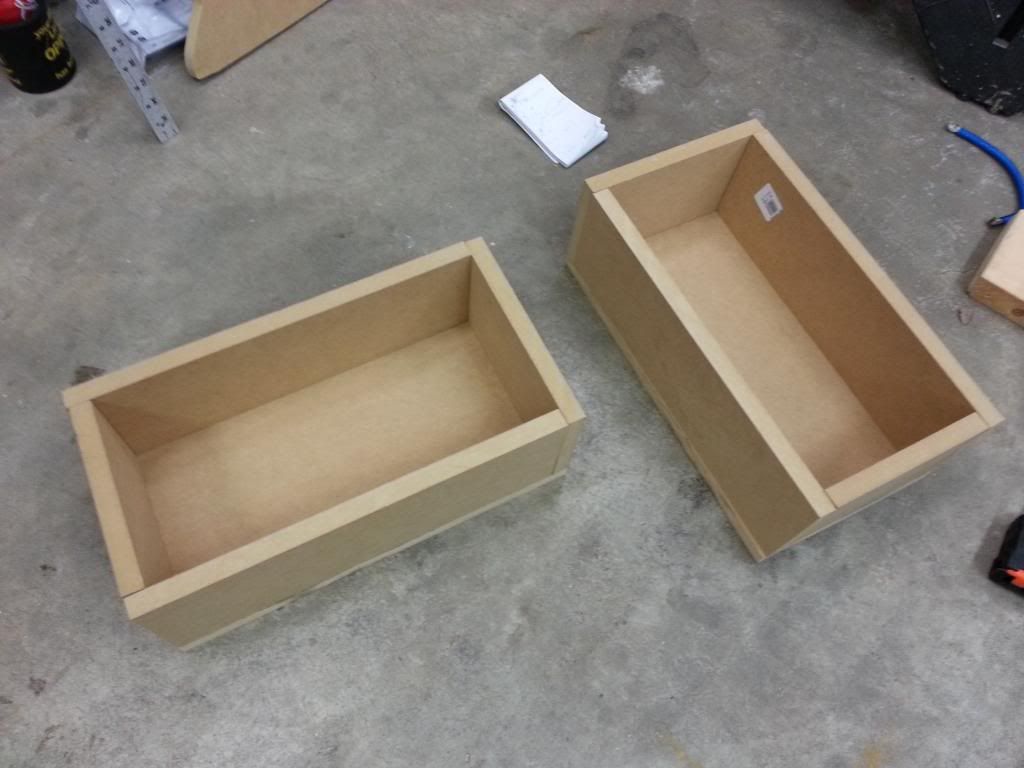 Inside dimensions are 15’’ X 7-3/8’’ X 5-1/4’’. This in Feet is 1.25’X.6145833’X.4375’ . Volume is .3361 which is a hair shy of Infinity’s recommended sealed enclosure of .35 Cubic Ft. I should have cut a tad longer on each chamber, but I figured I could take off the rubber magnet protector on the sub which would allow for a tad more volume giving me the little bit more I need. Honestly, being so close to the specs I didn’t think I’d have problem with the sound. I’m not an audiophile and I being how the box is setup it sounds real good how it is. Sand all sides if you cuts are a little sloppy. I glued the box together for the chamber portion with gorilla wood glue. I used 1-5/8’’ Drywall screws with a pilot hole predrilled along with countersinking the screw. Practiced on some scraps before attempting what torque setting to set at along with what pilot hole diameter to drill that will not split the wood (I forget the drill bit size). Next step is to unscrew the spare tire hold down bolt. If you notice, the tire is off center a bit. The chambers were partially assembled without being screwed to the Floor portion. Center the tire in the middle and set the one chamber on each side. You will see the chambers are snug between the tire and may require a slight sanding. I wound up sanding mine a little bit maybe 1/16’’. I wrapped the spare tire crank in a few rags and set it to the very rear standing up behind the tire in that cubby hole. The other pouch I wrapped in the rag and set in the center of the tire along with jumper cables wrapped so they won’t rattle. You will need to shim some areas under the chambers if you want equal support. Paint stir sticks cut in pieces come in handy to get a rough idea. I used a couple 1/8’’ pieces of rubber stacked together held down with permanent contact tape which was intended use was for ceramic tile. Works great. When you get a good idea where it needs to be, screw down the chamber with 2 screws spaced away for each chamber(4 total). This will give you a good idea how it will be mounted. Take the box out and make sure the tire isn’t jammed tight between the chambers. If so just sand a little off. Drill your pilot holes between the floor with chambers. Countersink the holes on the floor along with Glue and screw the chambers to it. I sanded all areas to make my cuts look good and smooth.  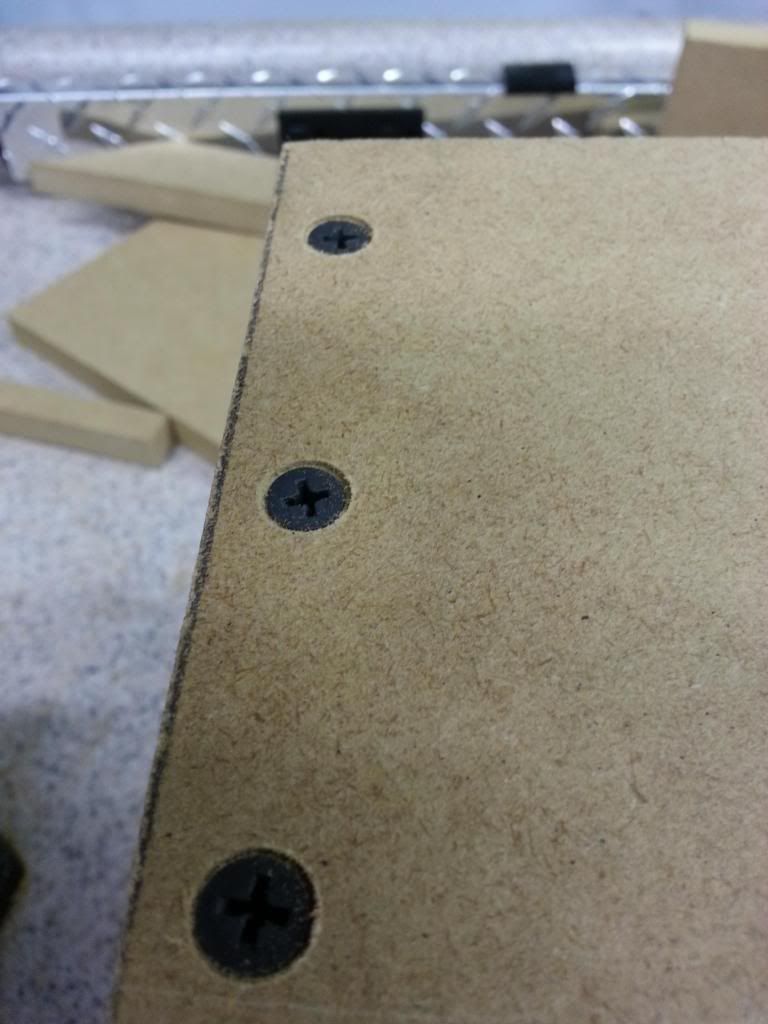 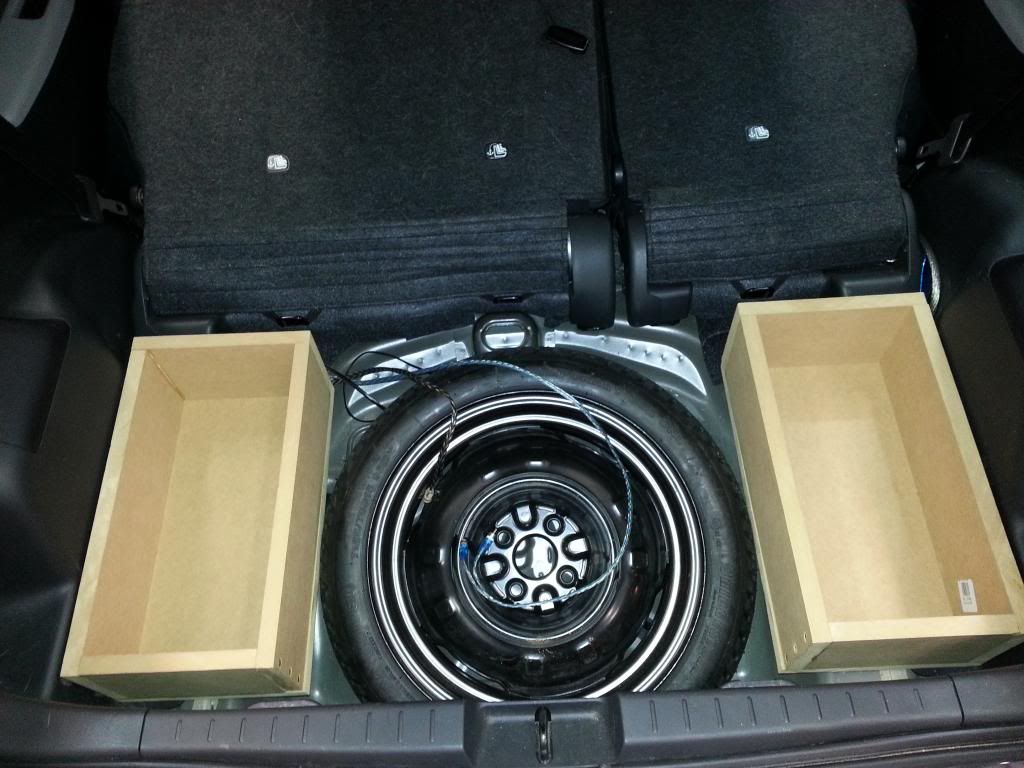  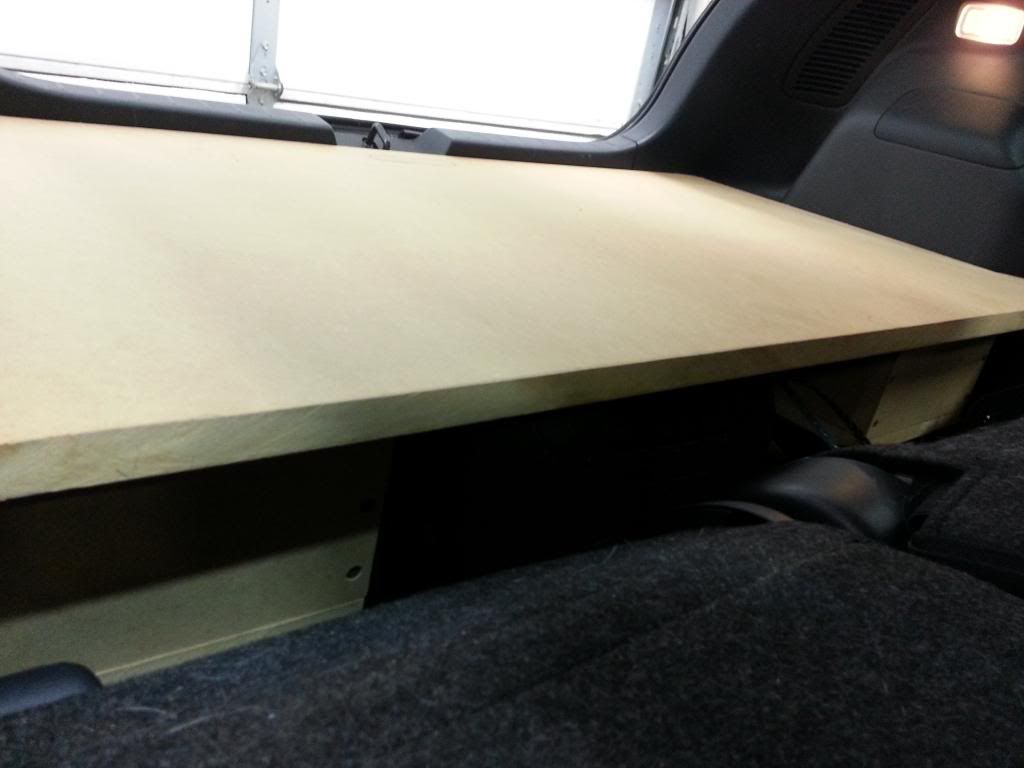 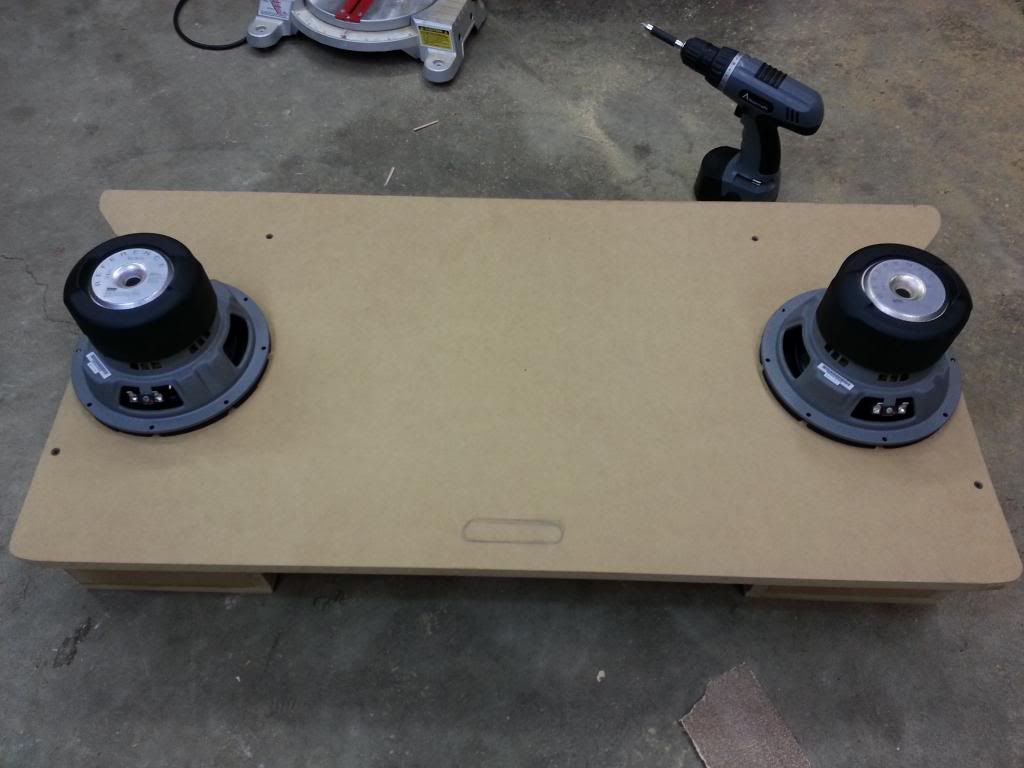  Next is to cut out the speaker holes. Make sure to center the 7-5/16’’ cutout hole between the Inside of the box dimensions which is basically centering it in a 7-3/8’’ dimension. I know it’s a pain. If anything make sure you hug towards the tire when you make your cut so you don’t get too close to the edge. You’ll save a little room that way for when you make your next cuts for the other floor overlay for the countersunk sub look. Mount the subs to make sure everything fits ok. Next is to take the second overlay and measuring the existing holes transfer where they will show up on the second overlay. Widen it enough to accept the outside diameter of the 860w sub by centering the sub over the traced hole. Trace the sub and cut out being careful not to get too close to the edge where it gets thin. 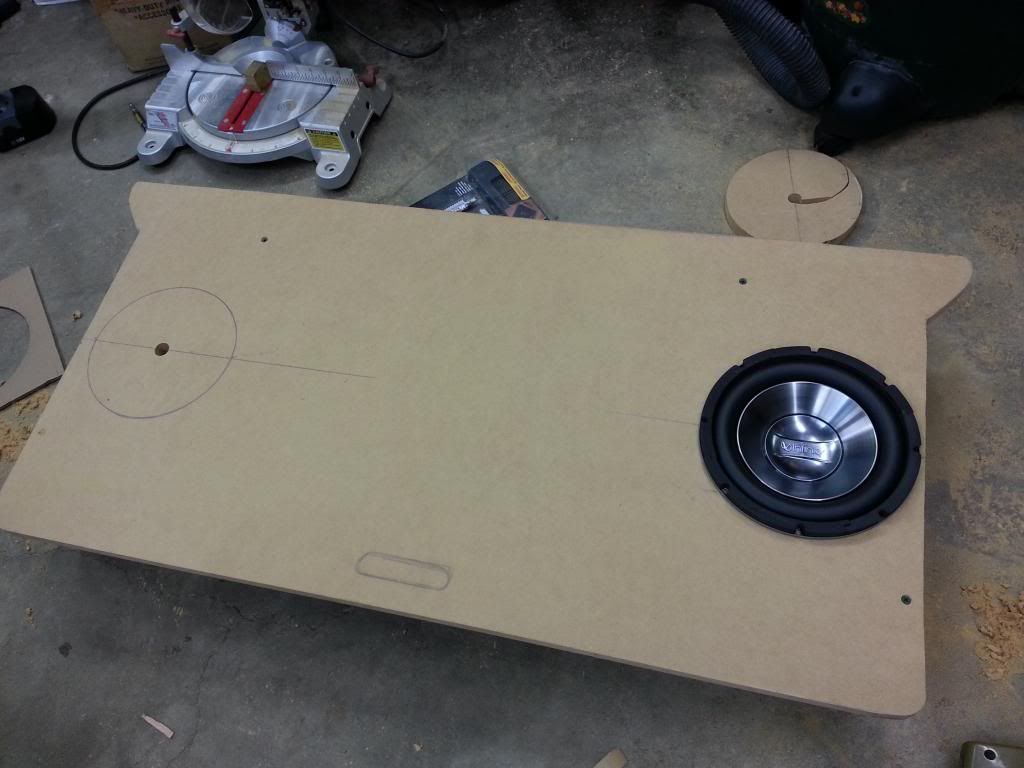 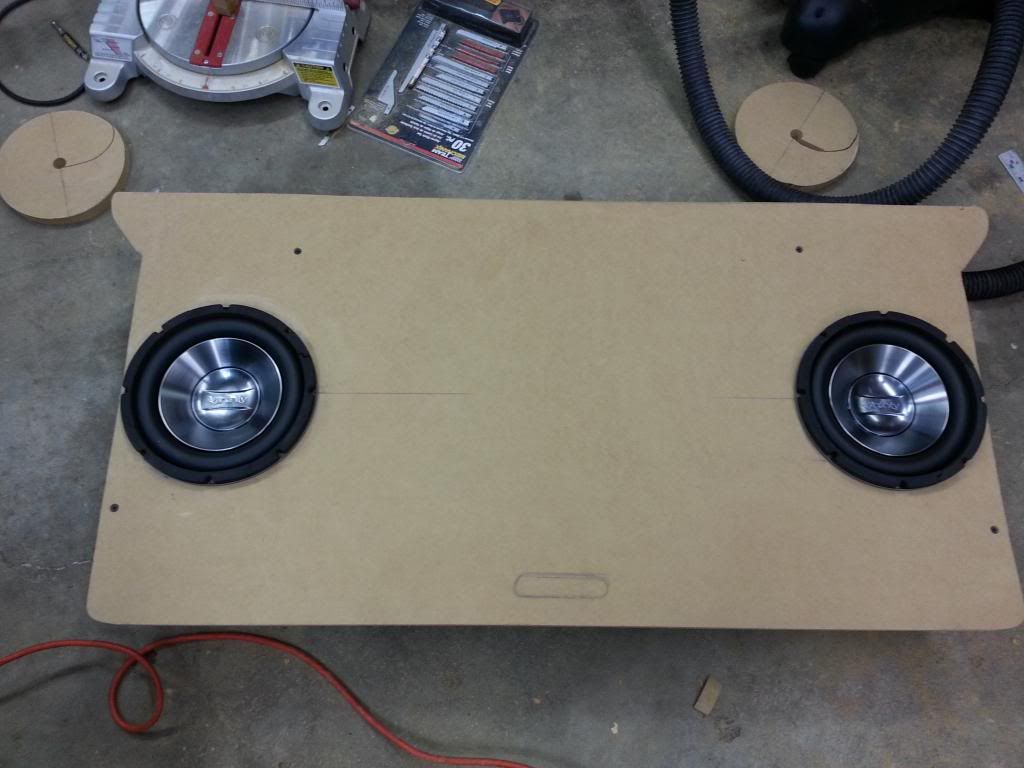 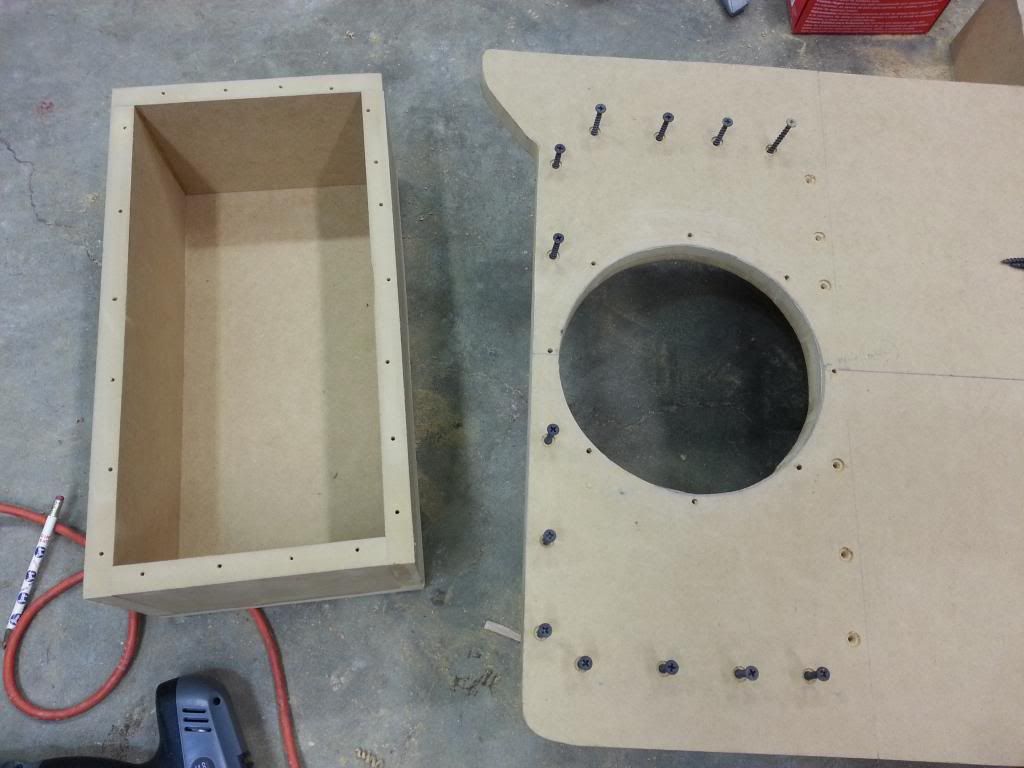  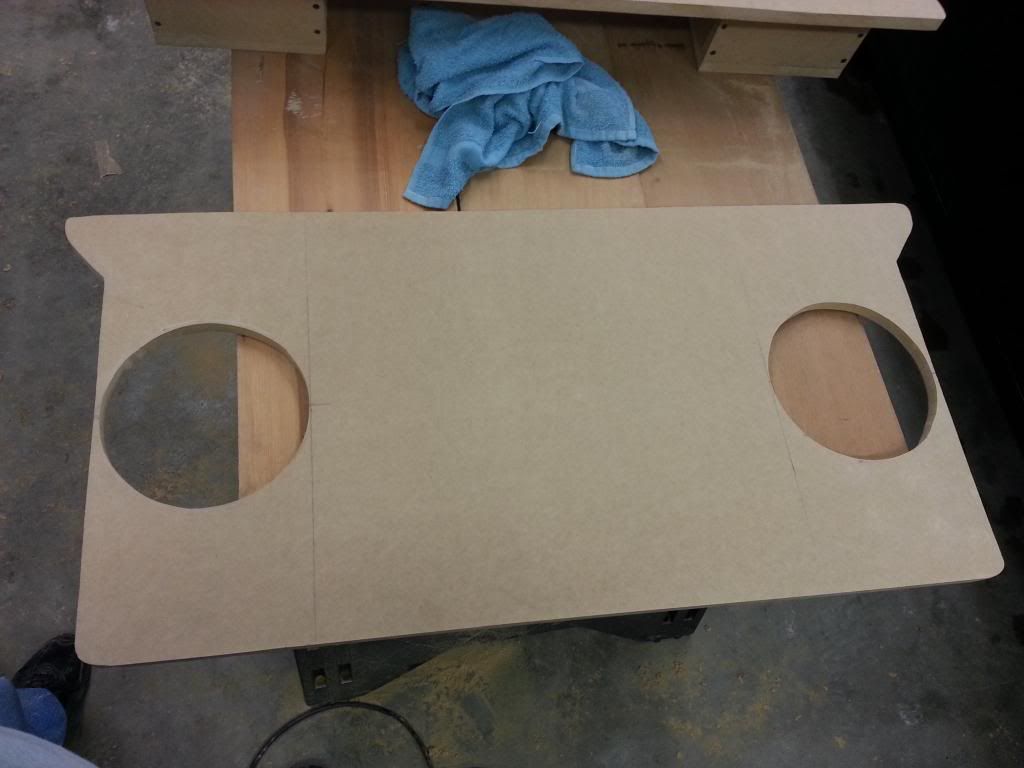 I used a sanding drum on a dremel to clean things up of if you need to widen it slightly. Test the fitment with the subs set in the first overlay box. If everything looks good screw the second overlay down to the first overlay box. Make sure to drill pilot holes and countersink. No need to glue on this since its not a chamber. I decided to use wood filler on the screw holes since I didn’t want anything shown through once carpeted. I cleaned up all edges of the box with a vibrating sander. This made sure that both overlay portions are lined up equally. I took a router to smooth the upper portion overlay out. Nothing aggressive just a smooth transition. I did that also to the upper overlay speaker cutouts. Be careful not to fudge up that thin area near the sides. 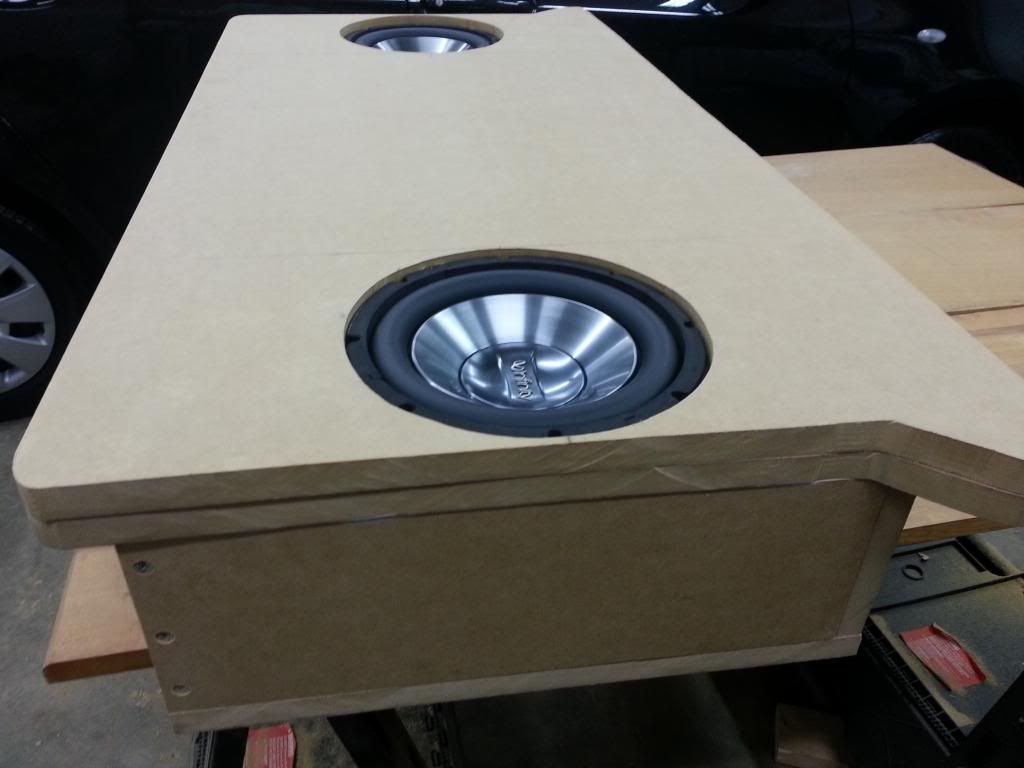 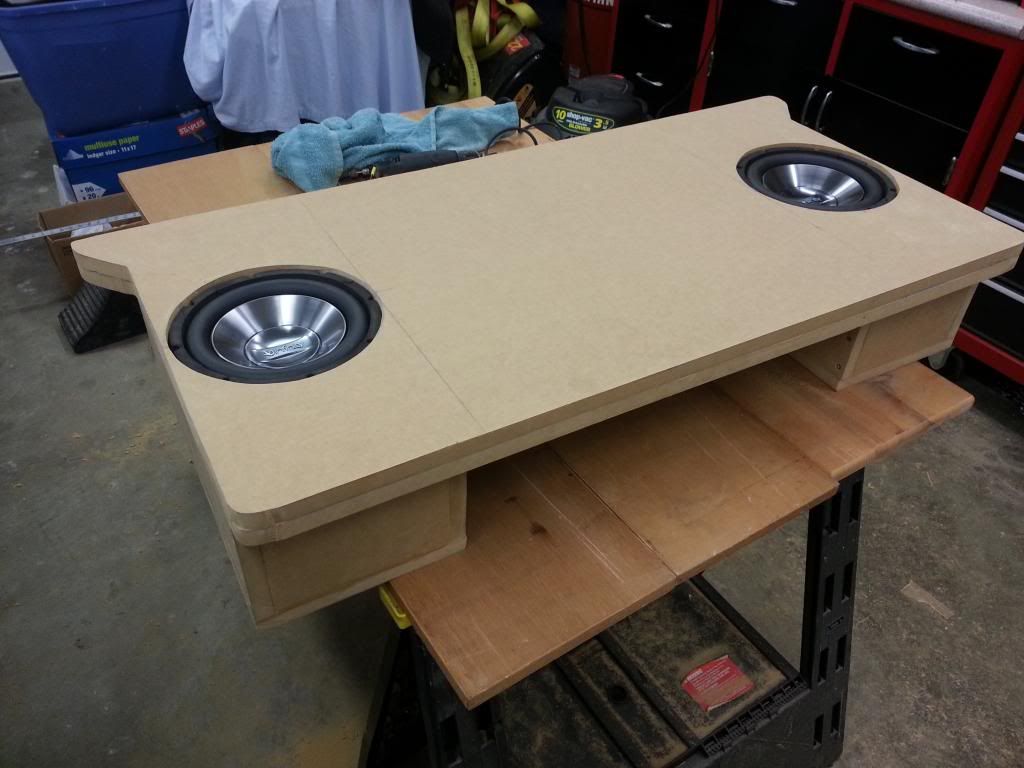 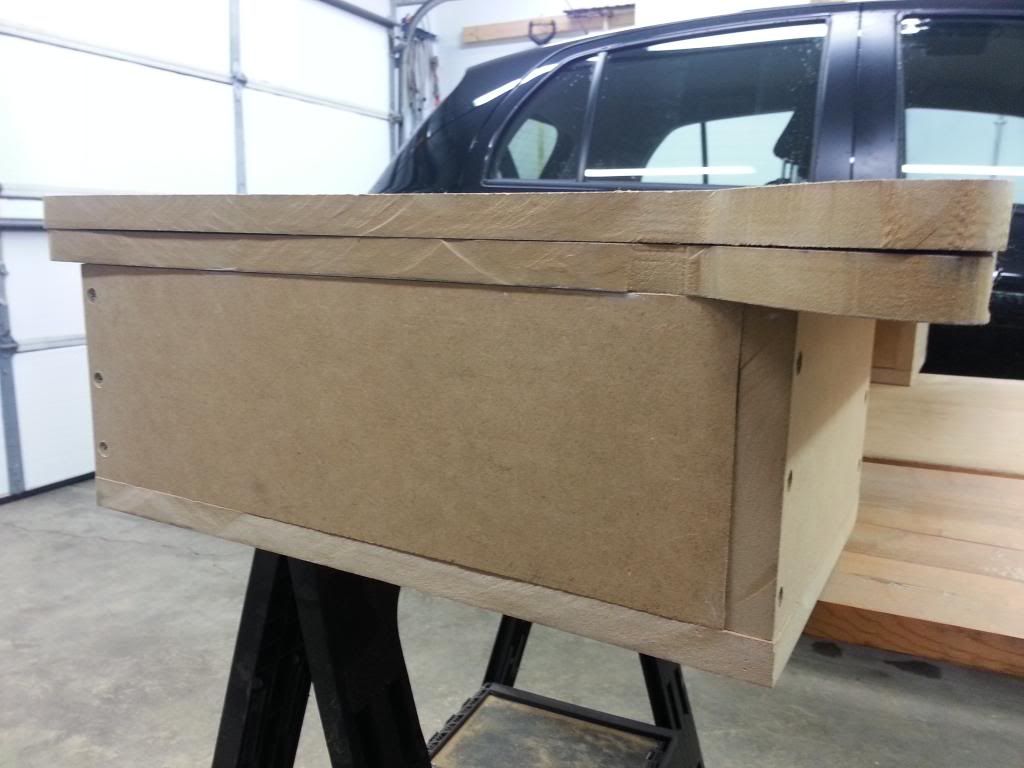 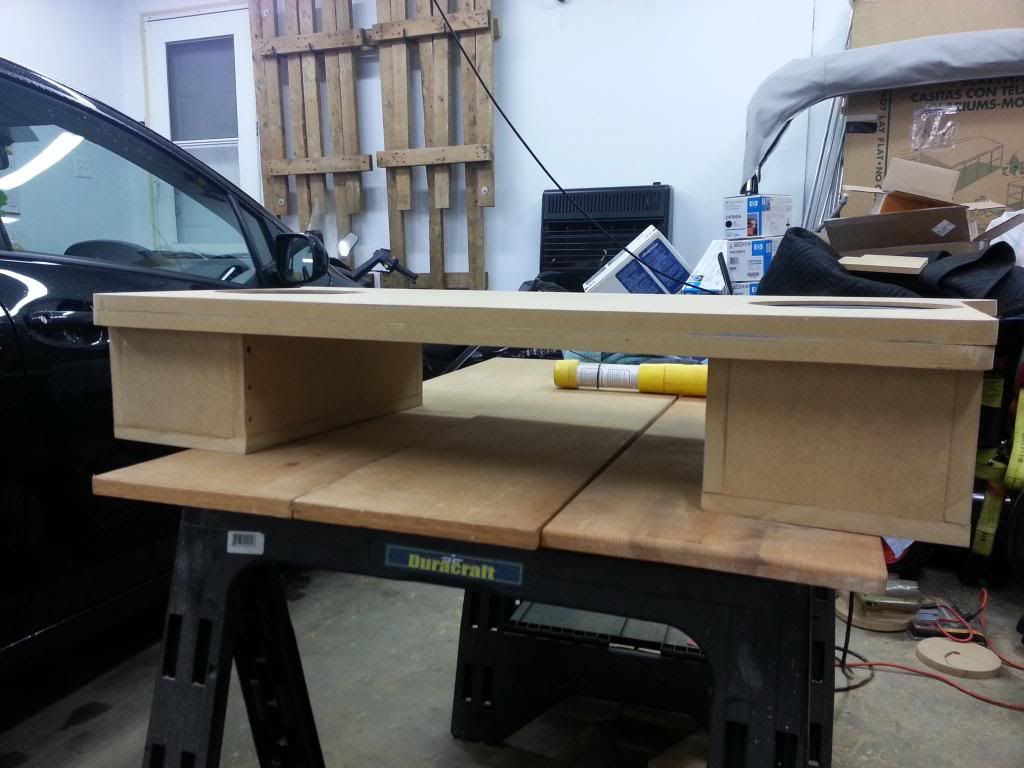 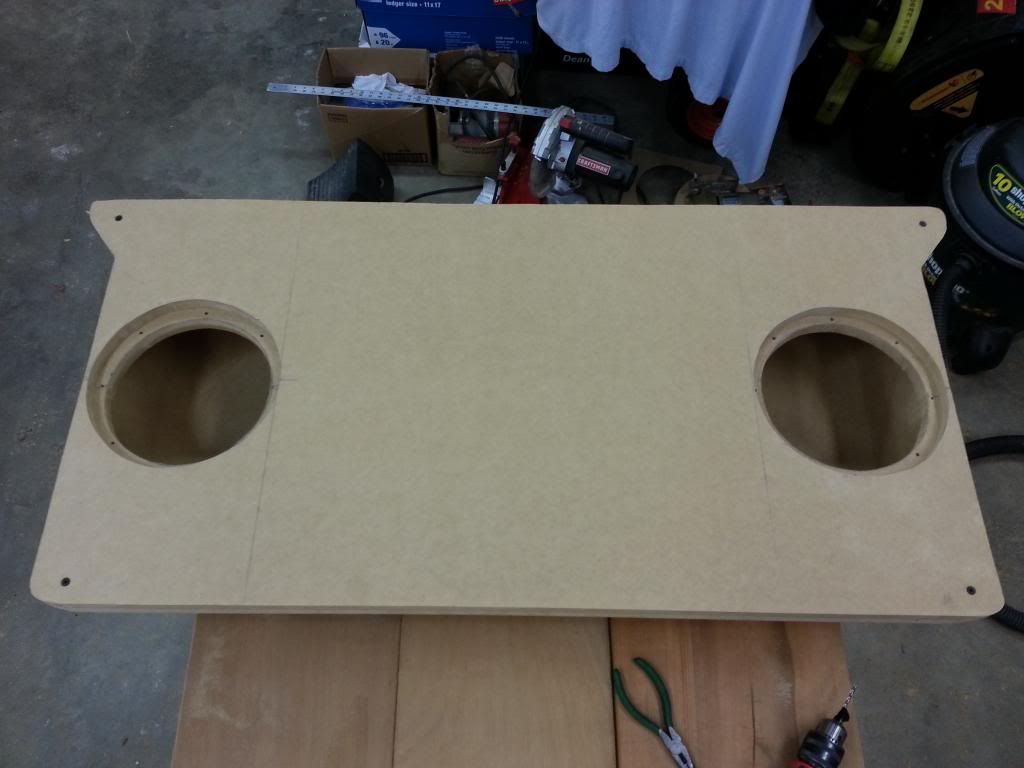 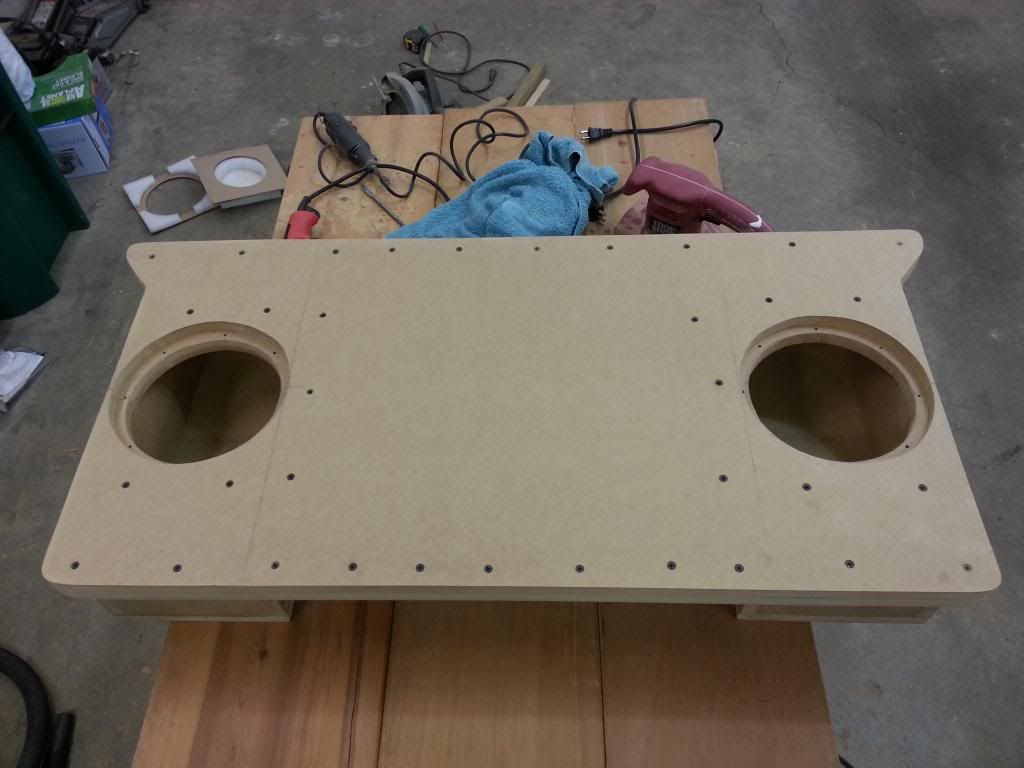 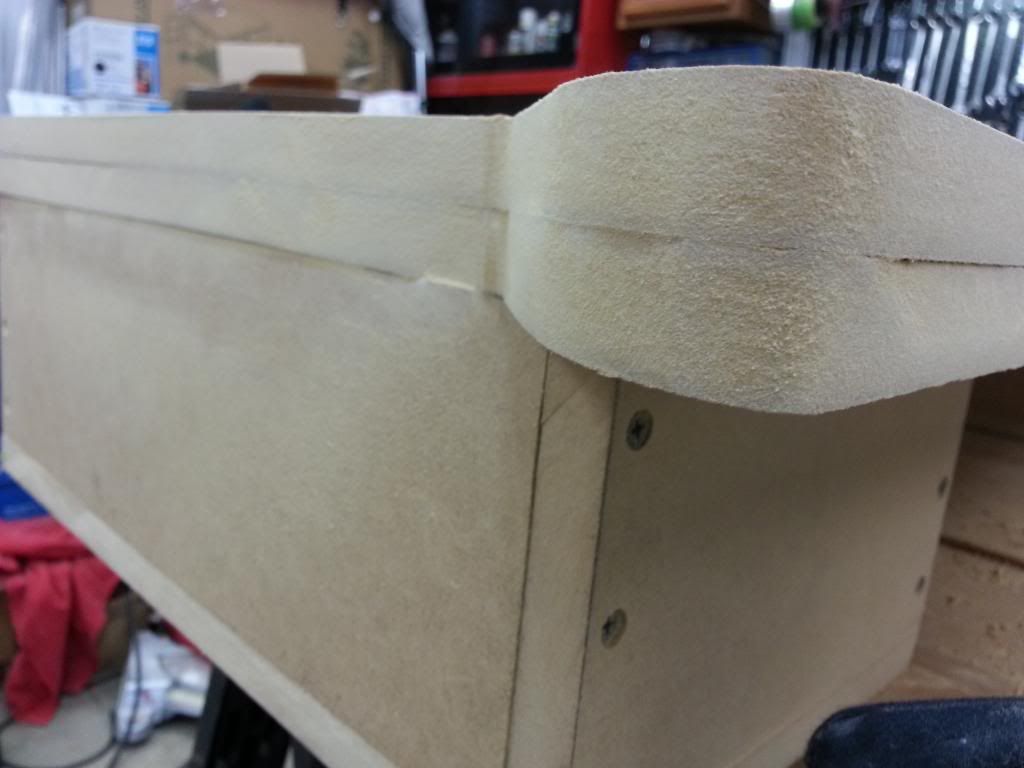 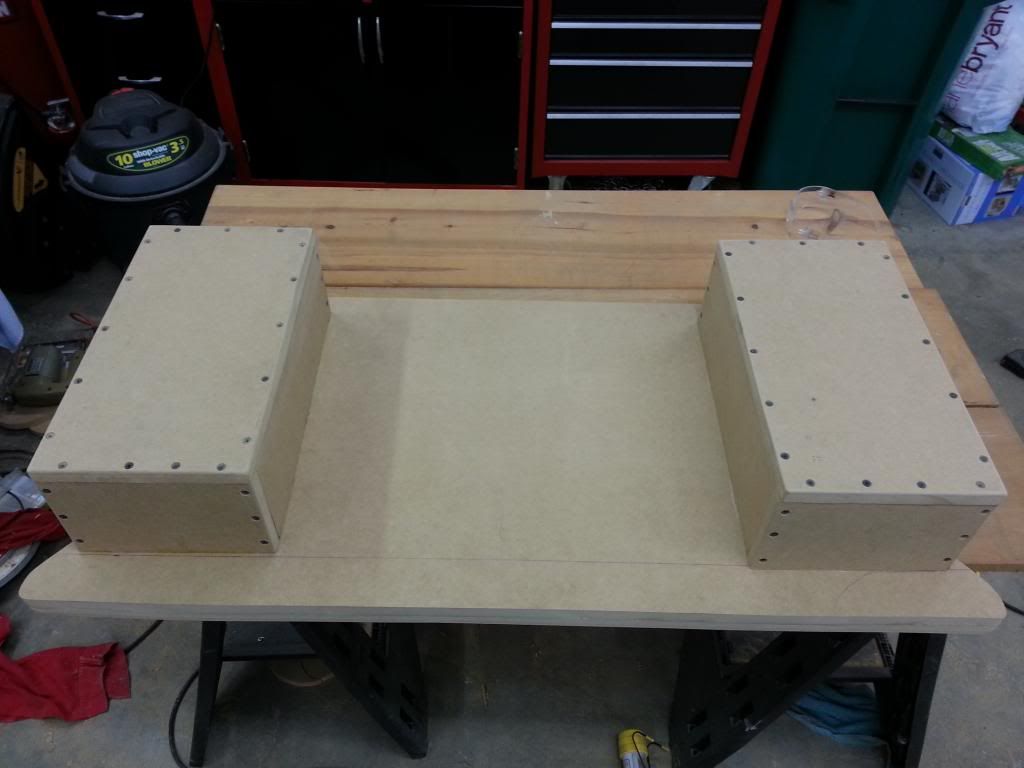 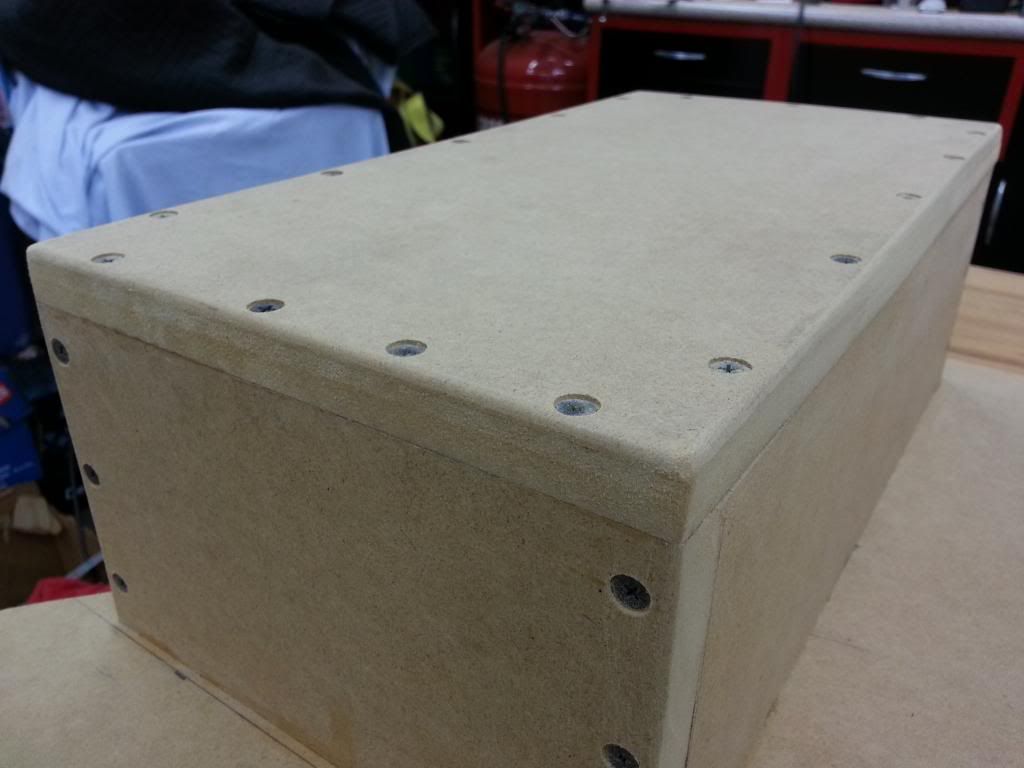 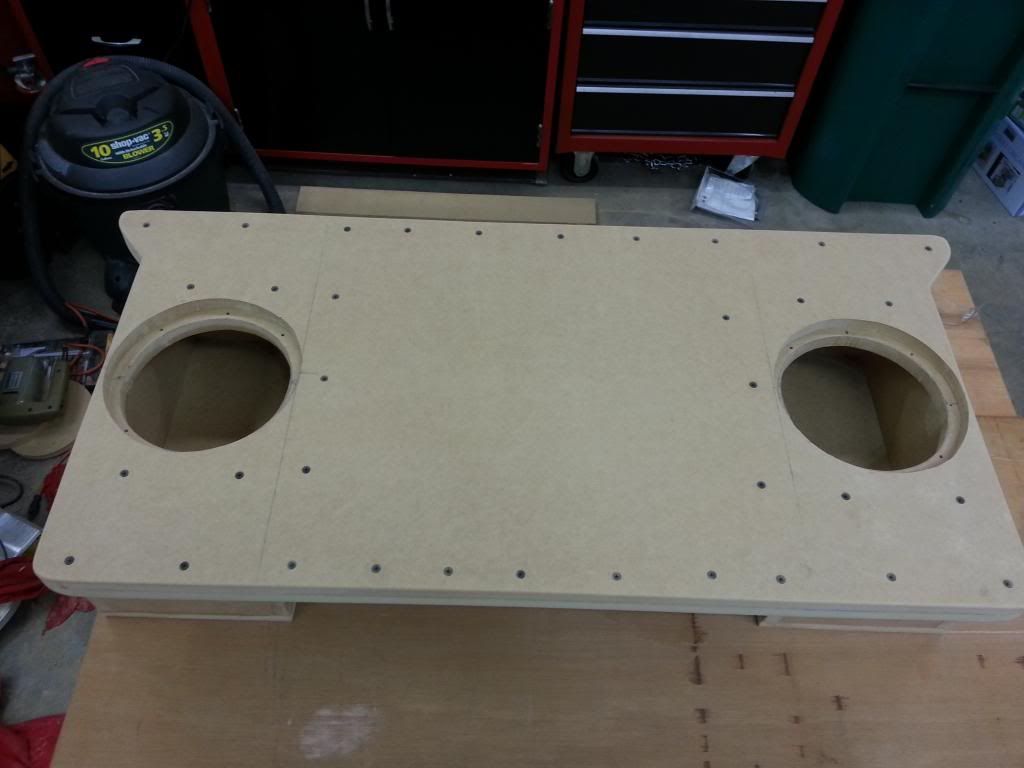 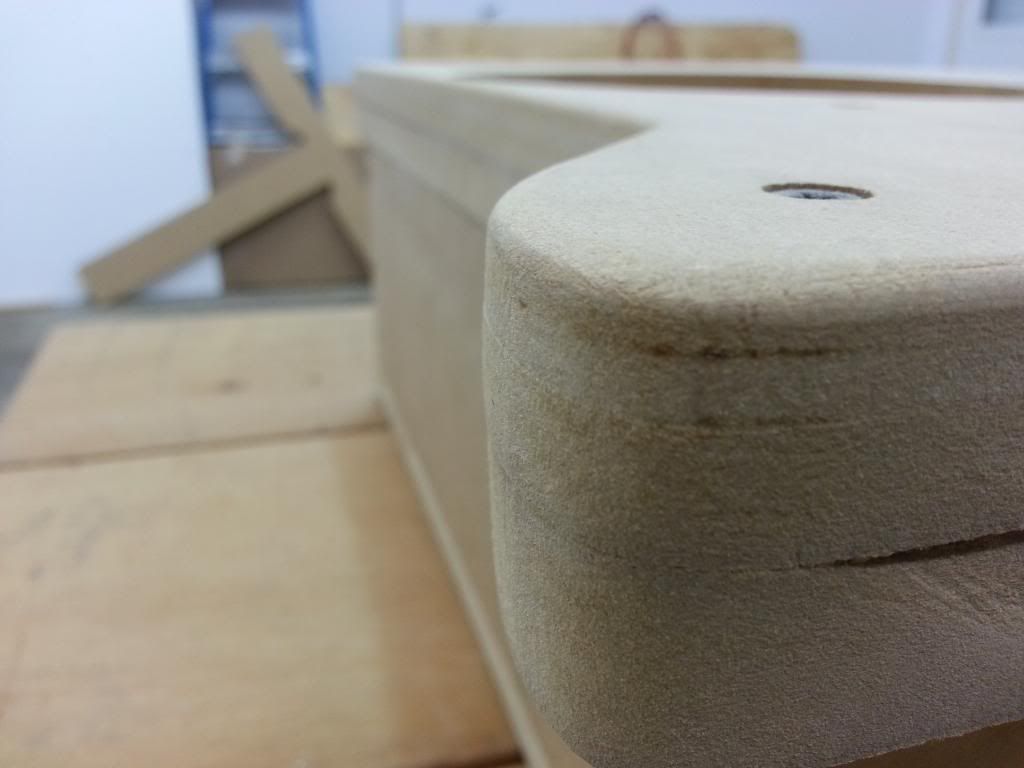 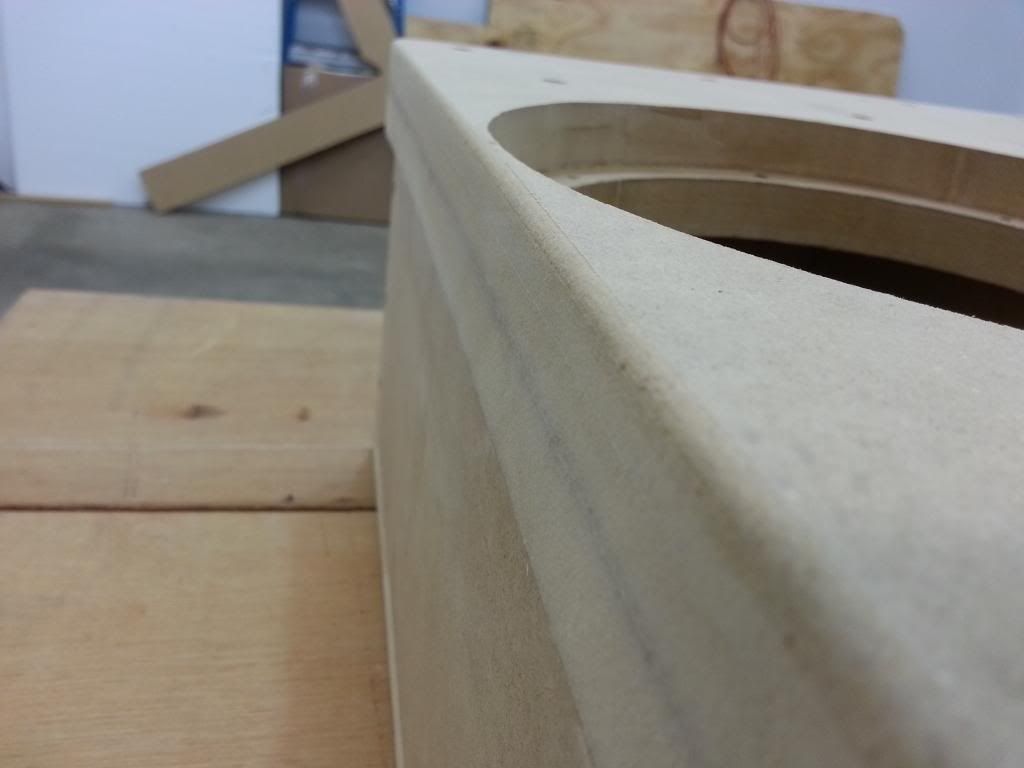 I did a test fit and everything fit good in the car. Next I covered the box with carpet from Menards. It was $0.44 Square Ft. I used Loctite Spray Adhesive 300 which is their Heavy Weight formula. Its good for high heat and water resistant. Good incase the dog jumps in with snow on his paws or just damp. I didn’t want my MDF to crumble or carpet to come loose. I cut out the approximate area where it goes and held it place with C clamps. I trimmed with a cheapo snap off blade knife but extended it out some for some easy cutting. Sprayed both the box heavily and the back of the carpet and set it down. Advice, get another person to help center it. The stuff grips like no other even when lightly set down. Smooth everything out. Set the subs in when everything is smoothed out and screw them down. I did not cover the bottom or sides of the box since you will never see it when in place. 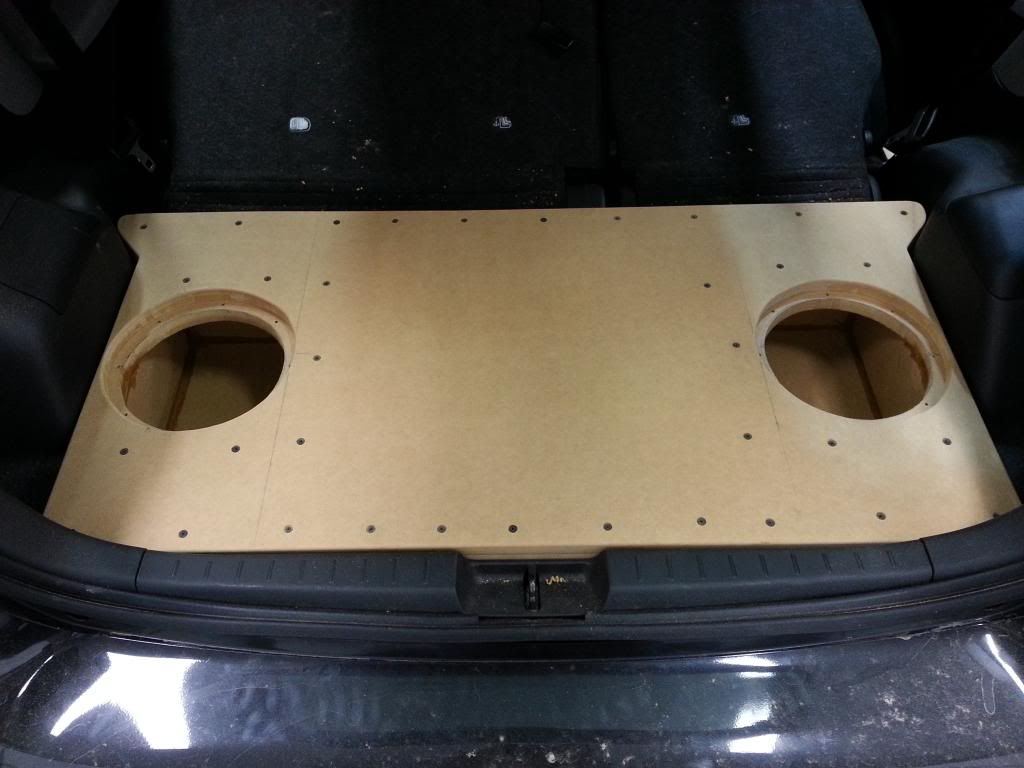 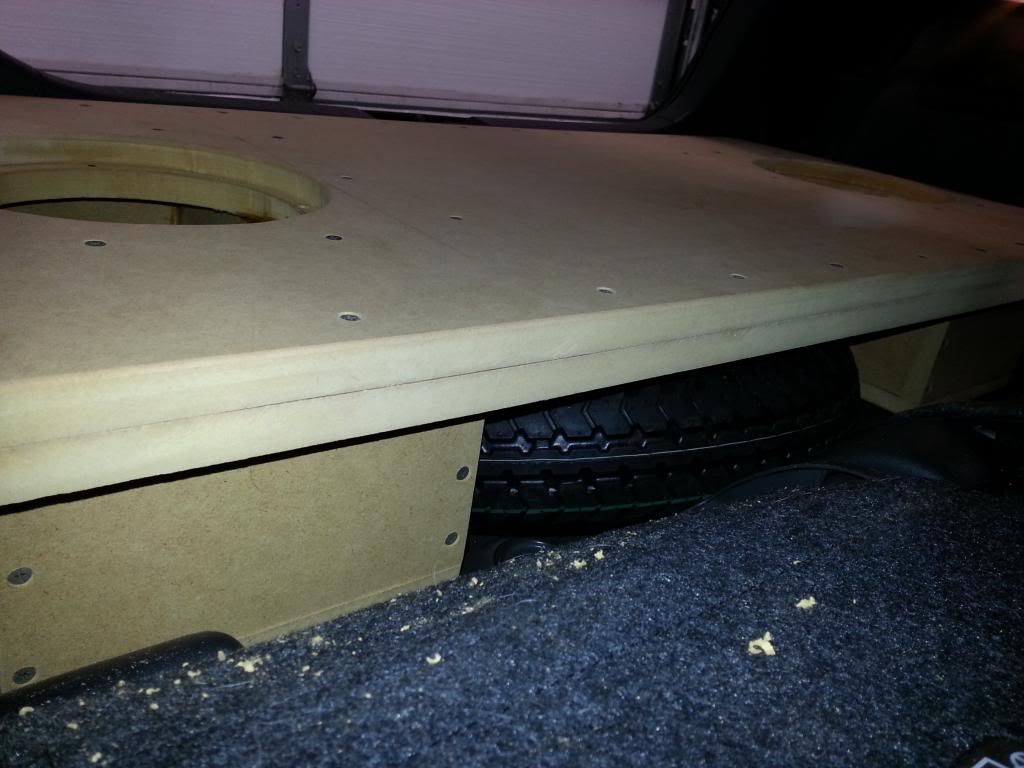 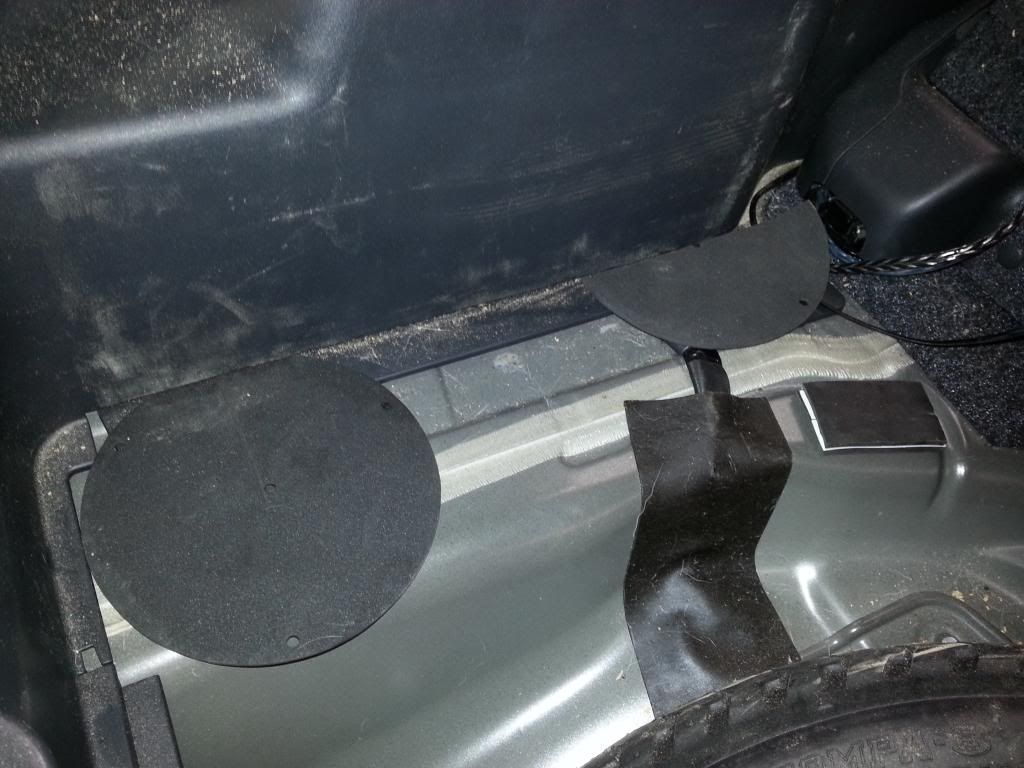 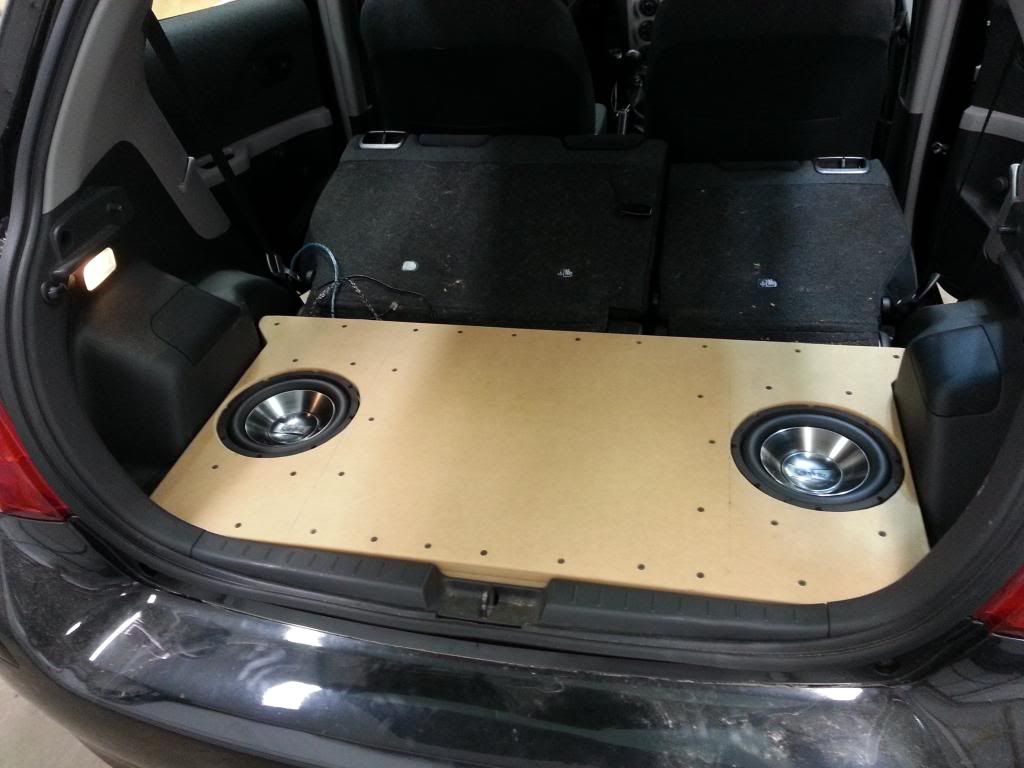 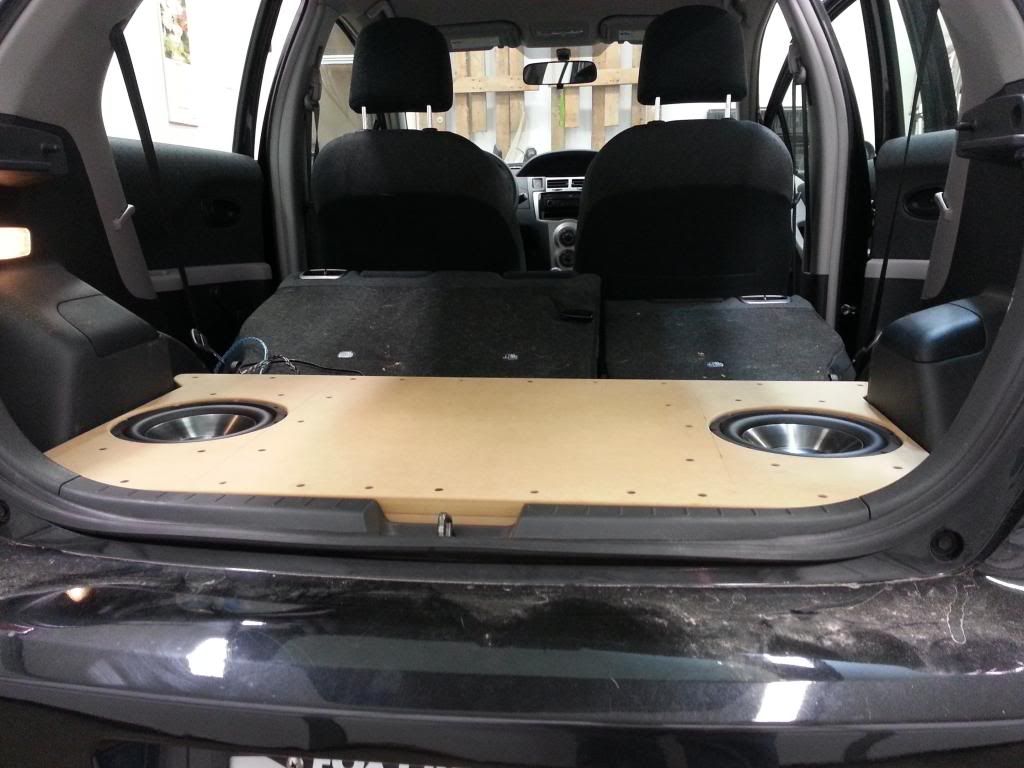  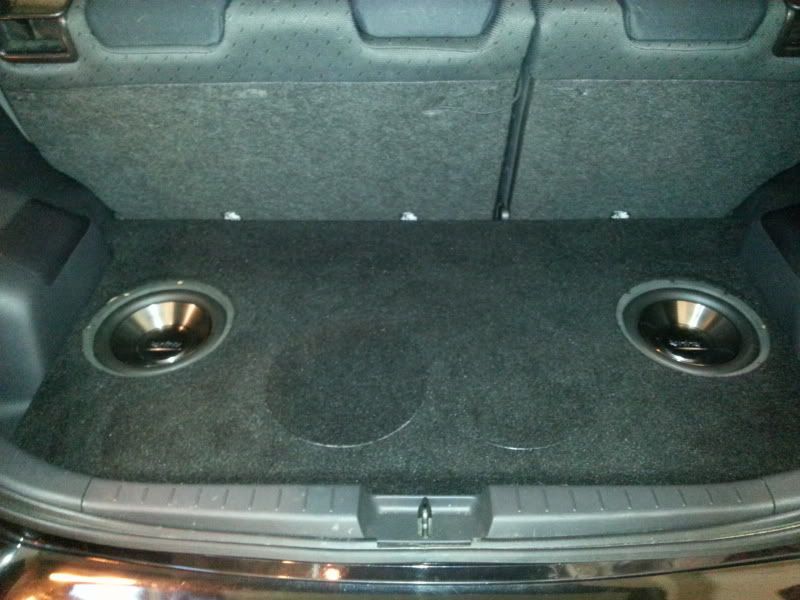 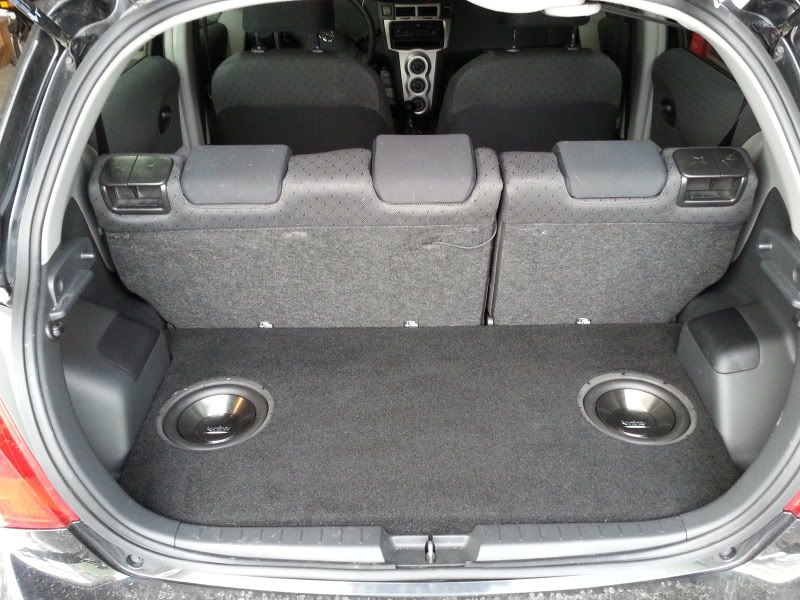 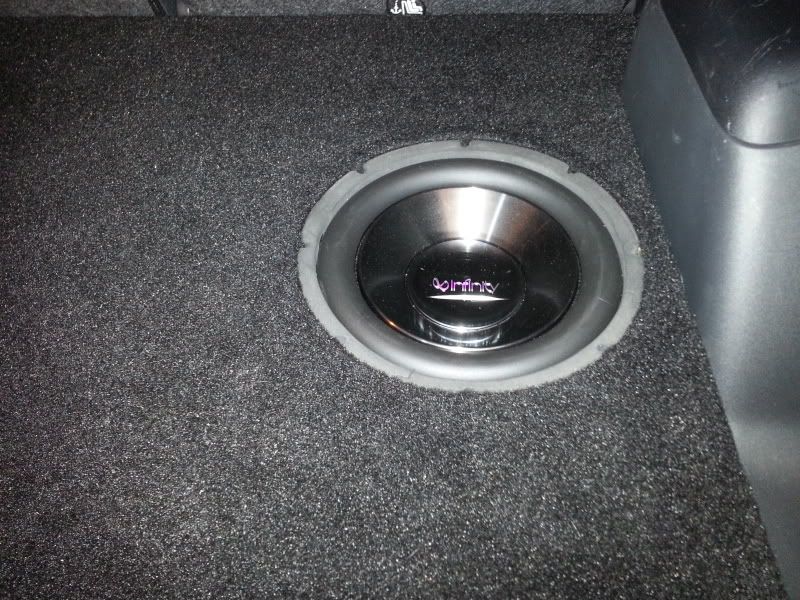 At this point the box really looks nice with the subs in it. I let everything dry good with the subs set in. After its dried, take the subs out and seal the inside of the box. This step can be done earlier. I used GE silicone that whatever was their top rating one. Seal all edges. Make sure you let it dry for 3-5 days. The stuff released from the silicone can damage the subs so be patient and wait a few days. I drilled two holes per chamber next to each other (basically one hole) just barely enough to get the speaker wire through. I used silicone on that for the inside and outside. 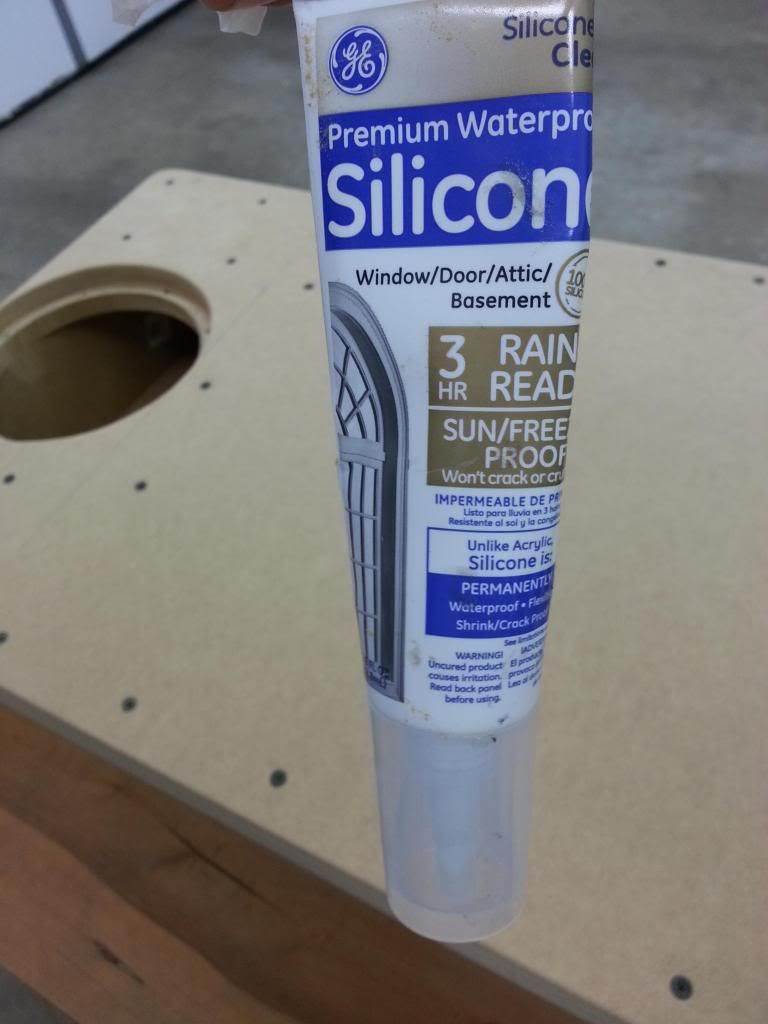 After everything is dry set the subs in and hook up your amp. I originally was going to have my amp mounted upside down on rubber isolators above the tire towards the rear of the car under the cargo floor sub box. I scrapped that idea and went with a class D Rockford Fosgate Prime R500-1D . The dimensions are a basically 8’’X8’’X2-1/2’’ . It is able to be mounted under the passenger seat and just have it set there. Its rated for a guaranteed 500w @2 ohm RMS (CEA-2006). The certificate I got with mine tested out at 572rms. It really is a nice setup paired with these subs. I made speaker covers by cutting out slightly less of a diameter of the holes where the subs are sunk into out of 1/8’’ aluminum plate. I used a metal jigsaw blade and went slow. I cleaned the edges up with a dremel sanding drum. I Traced some carpet material and used the adhesive spray to join it to the aluminum plate. On the other side I traced some 1/16’’ Gasket material and joined it with adhesive to the plate. Now I have a perfectly flush carpet when the covers are over the speaker. The rubber acts to hold the plate in place somewhat and also aids in not scratching the speaker incase of an accidental slip of brushing up against it. I do have a cut off switch up front that I shut the subs off when I install these so the amp does not turn on. I thought about installing some straps like pennyracer did on his setup. Because they are light to pickup just pinching and pulling the carpet is enough to lift then. You can also run your finger nail near the edge and get a lift on it that way too. 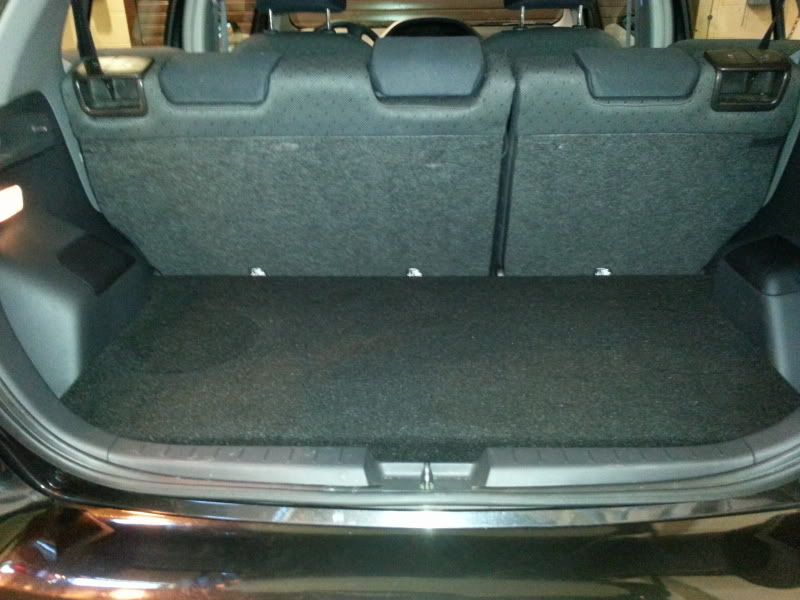 As you can see the speaker cover was just set on for the left side. If I turn it the correct way it is a lot more stealth. 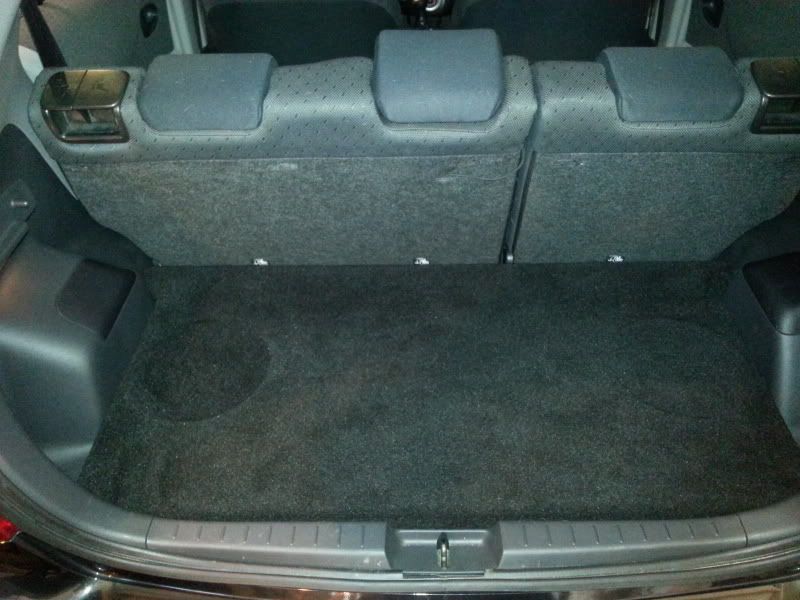 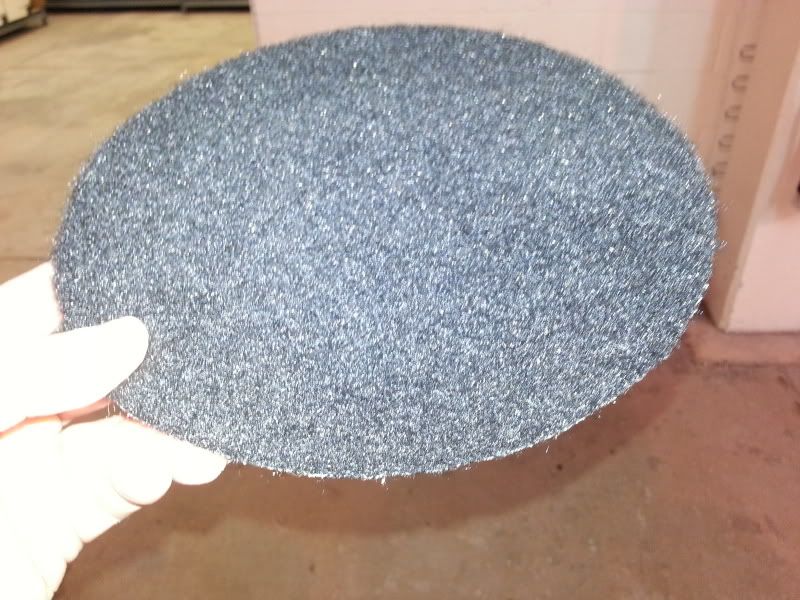 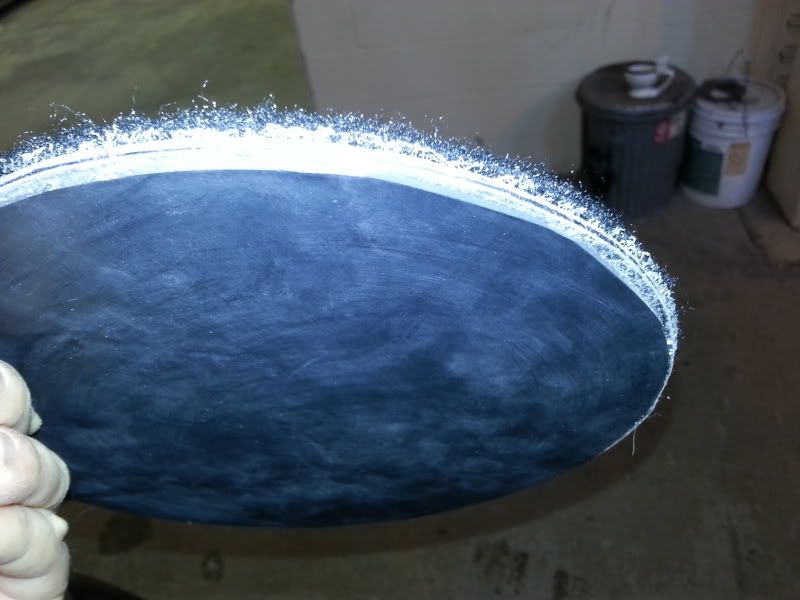 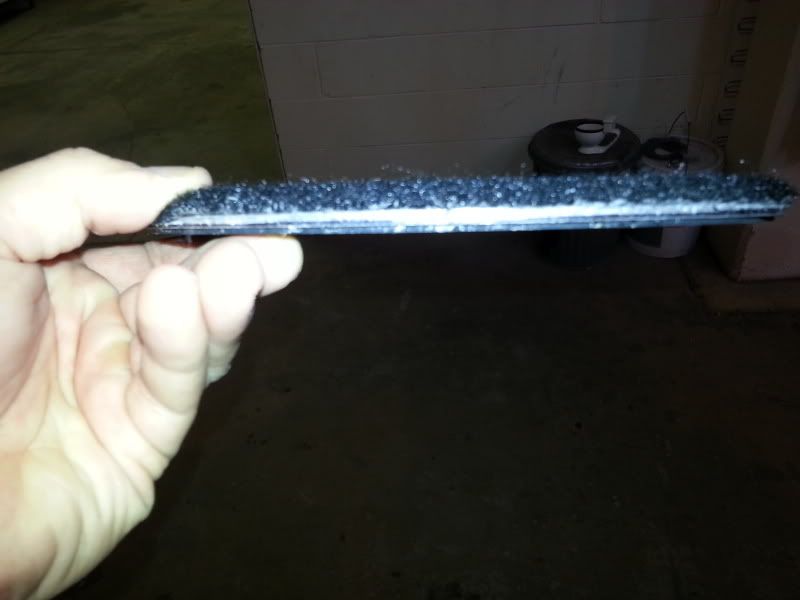 Results: Coming from two 12 inch subs that were hooked to a massive a/b profile amp to two 8 inch subs hooked to a little class D 500w amp. I have to say I am very impressed. The sound before was too much for the car. I even adjusted the gain where I wanted it however I always fiddled with the remote bass control to constantly adjust songs. Now I know the amp was way too much for this car. Argue if you want, this is just my opinion. If you turned the gain up it rattled the crap out of the car and would give you a headache after a while. The 8s I don’t have that headache feel because the SPL is not like the 12s although cranked you still feel it with a decent punch, just not overwhelming. The sound quality is much better I think and the rattles don’t happen like the other setup due to less SPL I think. It just sounds more accurate in my opinion. When the back hatch is open and your inside you don’t really hear/feel much but soon as you close it up and sit inside it sounds real nice. Kind of reminds me of what the difference between someone putting a good system vs a cheap one in. I’m not saying this is high end, but for what it is I feel happy the way it sounds. Now my only problem I would like to be able to tweak is my other speakers. I would like to get a PBR300X4 which is a small 4 channel amp by Rockford Fosgate. Reason I chose this brand was it was a decent price and the size factor. Also I wouldn’t mind keeping the amp manufactures the same. I would say I would like to add another amp not because I want it loud but because I would like to control the power to the other speakers along with installing some nice Infinity’s in the stock locations. This way things may sound a little better. Still though, I think it still sounds decent enough. The deck I have is nothing spectacular of a brand. All in all it is a great setup and not too much money invested. Price To make this box is as follows: Carpet: $6.50 MDF: $32 Spray Adhesive:$10 Screws: $5 Silicone: $5 Misc Sand Paper etc: $5? Glue: $5 Tile Tape: $4 Total: $72.50 Around $85-$90 if you count the Speaker Cover Aluminum plates. Last edited by Ataristyle; 03-15-2013 at 06:53 AM. |

|

|
|
|
 Similar Threads
|
||||
| Thread | Thread Starter | Forum | Replies | Last Post |
| Sub Box Desgin | talnlnky | In Car Entertainment + Electronics (audio / video / alarm) | 5 | 08-23-2009 01:45 AM |
| Cargo Box for Yaris 5 Door | Tolley | DIY / Maintenance / Service | 0 | 07-04-2009 04:36 PM |
| DIY: Custom Hidden Trunk Box (08 Yaris 3D) | goku87 | In Car Entertainment + Electronics (audio / video / alarm) | 0 | 10-19-2008 05:43 PM |
| Recent box build | spkrman | In Car Entertainment + Electronics (audio / video / alarm) | 8 | 01-26-2007 03:14 PM |


 Threaded Mode