
 |
 |
|
|
 06-21-2014, 07:51 AM
|
#19 |
|
Form>Function

Drives: 07 Flint Sedan Join Date: Dec 2009
Location: Tampa
Posts: 4,018
|
I thought our cars toed in slightly with a drop? Its nothing that should effect handling and tire wear but i think it still does toe in.
__________________
Instagram: @southernstreets_phil Facebook.com/southernstreetsempire 
|

|

|
|
06-21-2014, 08:47 AM
|
#20 |
  
Drives: 2010 Yaris 3 door, manual tran Join Date: Jul 2013
Location: --
Posts: 207
|
This is getting intense, and I'm not even installing them. This is a great thread for me as I will be installing tein s lowering springs with tokico blues in about 2-3 weeks.
Sent from my iPhone using Tapatalk |
|
|
|
|
06-22-2014, 06:43 PM
|
#21 |
|
Minimalist
Drives: 07 silver sedan Join Date: Jun 2014
Location: Mississauga, GTA, Toronto, ON
Posts: 432
|
Sore today. When you look at the rushed and a touch improvised fashion that my brother Telly (forum name) does these installs, you'll understand why.
So my brother decides to do the rears first.    Dropped the rear seats, ripped up the plastic panel just above the opening to the trunk, enough to rip out the panels on both sides of it. To access the rear shock towers. If you want to do it quick, use your hulk strength to just pull at the bottom rim of the rear centre panel until something gives way, and you'll snap a couple of little clips, which served to hold the top plastic panel on and against the side panels. If you want to do it right, you'll shine a flashlight from within the trunk, and you'll see the ends of the clips and understand a bit more about your car. My brother and I are polar opposites when it comes to this stuff. |
|
|
|
|
06-22-2014, 06:54 PM
|
#22 |
|
Minimalist
Drives: 07 silver sedan Join Date: Jun 2014
Location: Mississauga, GTA, Toronto, ON
Posts: 432
|
You see that whitish looking bit of hose that connects to a little bracket on the rear torsion beam? Yeah, once you take out the bolt holding the rear shock there, that part of the beam will just drop down. So you might want to unhook this bracket beforehand, to avoid any undue tension on that flexible, fragile looking hose. None of the manuals said anything about it, but there's no harm in screwing the bracket on again afterwards.
  The picture above is WRONG! The OEM dust cover must be cut to length to provide the right spacing to the shock tower at the top, but at the same time provide just a little plastic below to overlap the Tein dust boot.  Slicing up the stock dust boot to length. Just before bolting it down, I realised the Tein's dust boot would not play nicely with this one at the length you see there (behind the rubber thing I'm holding). The manuals don't specify the length for this one. Then I took out the little rubber bit (pictured in hand) from inside. You can use a screwdriver to pull it out, but I just stuck my middle finger in there (be quiet, you pervs). That made it easier to chop off the rest of it, pretty much to a 1/4" below the metal part's lowest point (see inside the cover to find that). 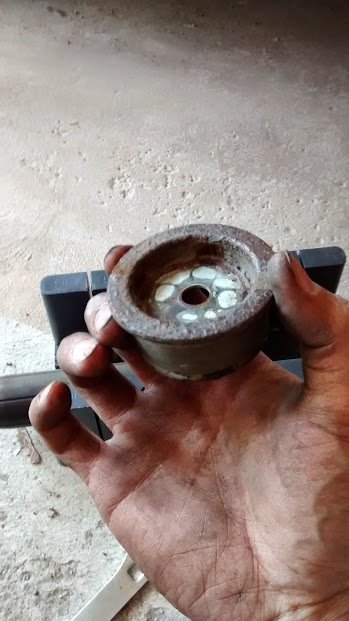 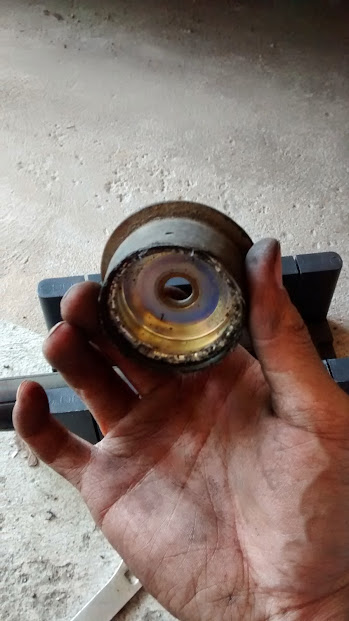 Clocked the lower shock bushings before lowering the rear. I don't know if it helps, but it at least doesn't hurt. Did it with the rear axle jacked up to stock distance to fender. Then it all got tightened. Last edited by sheekeebut; 06-23-2014 at 12:24 AM. |
|
|
|
|
06-22-2014, 07:09 PM
|
#23 |
|
Minimalist
Drives: 07 silver sedan Join Date: Jun 2014
Location: Mississauga, GTA, Toronto, ON
Posts: 432
|
Just a side note. You WILL need help doing this. But also consider your help's personality, because it may not match with the way you work.
So I measured off the H.A.S. (height adjustment system) as recommended by the manual. But then my brother was suddenly burdened by an urgent change to his schedule, so we had to hurry up on this install (I HATE THAT). So I decided, instead of using default figures right away, I threw on an extra 4mm to the default 46 mm on the adjustment base that the Tein manual called for. That was then installed in the rear without a hitch. Another thing. when you send the shock up to the top of the tower, you'll have trouble with the Tein top nut screwing in enough to grab at the wrench flats at the end of the rod and tighten the whole thing up the right way. Well, that's where my brother made use of his small impact wrench. I hope it didn't spin the rods too much and funk up the dampener internals. Last edited by sheekeebut; 06-25-2014 at 10:22 PM. Reason: Not 25, but 46 mm default, still talking about the rear. |
|
|
|
|
06-22-2014, 07:26 PM
|
#24 |
|
Minimalist
Drives: 07 silver sedan Join Date: Jun 2014
Location: Mississauga, GTA, Toronto, ON
Posts: 432
|
Front driver's
 Notice the jack stand under the frame member. Yeah, we had the bright idea of raising only one side of the car to do the front struts, so we needed that as a "safety", in case the side jack point didn't hold up. Well, don't be stupid like me. Use the designated front central jack point, regardless of how far in and under it seems. Make use of the regular Canadian Tire sales to get that lower-down flatter profile floor jack with the cushioned cup. Spend that little extra time carefully sliding that thing under the car and using tiny tiny steps at first to finally get it to lift. You'll save yourself hours of fiddling around with two jacks, and there'll be less uneven load up in the fronts caused by the front sway bar. The various bolts unhooked    Smaller jack in the last pic is to lift up the lower arm to get the (much shorter than stock) Tein strut into the tower. The jack stand in front of rotor was some ghetto way of keeping the whole spindle from swivelling around in pretty much every axis. Later on did we find some blue plastic twine to temporarily tie the spindle to something solid above (strut tower hole). Last edited by sheekeebut; 06-23-2014 at 07:33 PM. |
|
|
|
|
06-22-2014, 07:44 PM
|
#25 |
|
Minimalist
Drives: 07 silver sedan Join Date: Jun 2014
Location: Mississauga, GTA, Toronto, ON
Posts: 432
|
Finally smartened up a little and jacked up the front. Notice the passenger's side dips way down compared to the driver's side. Now, imagine how much trouble we had trying to knock out the passenger's side end link. Solution: jack up the passenger's side lower arm, to match the height on the driver's side.

|
|
|
|
|
06-22-2014, 11:37 PM
|
#26 |
|
Minimalist
Drives: 07 silver sedan Join Date: Jun 2014
Location: Mississauga, GTA, Toronto, ON
Posts: 432
|
If your Tein Street Basis front right strut looks like this, it should be good. Then you can install the ugly rubber hat on top.

|
|
|
|
|
06-23-2014, 06:58 PM
|
#27 |
|
Minimalist
Drives: 07 silver sedan Join Date: Jun 2014
Location: Mississauga, GTA, Toronto, ON
Posts: 432
|
Tools I didn't expect to need:
======================= Saw and bench: for cutting bump stops. The hand saw and flimsy plastic bench did the job, but not easily.  Side cutters: a poorly cut bump stop from a cheap saw needs a (relatively) good trim. Also useful for last minute trimming when you realise, after you've mounted the rear shock, that the dust cover is still too long.  A decent jack: That economy sized 1.5 ton jack is usable, but a real pain, even for this economy car. Used it only to support a main jack, like for lowering and raising the side jack points and spindle assemblies when unhooked from shocks/struts. I say a real jack for lowering MUST have a lower profile, and a cushioned cup, if you really care for your ride. Below=crap, but still useful  Below=great, and on sale frequently  Electric impact wrenches of various sizes: These are great time savers. And though they caution against these on shock piston rods, they were the only way to get enough wrench flats from the rear shock bolts to pull all the way through.   Sent from my XT1032 using Tapatalk |
|
|
|
|
06-23-2014, 07:15 PM
|
#28 |
|
It's the illusion you see
Drives: 07 Yaris Sedan Aero Join Date: Oct 2006
Location: Brossard, QC
Posts: 3,888
|
lol you used saw to cut the bump stop!! A knife was all needed to cut it with precision!
__________________

|
|
|
|
|
06-23-2014, 07:20 PM
|
#29 | |
|
Minimalist
Drives: 07 silver sedan Join Date: Jun 2014
Location: Mississauga, GTA, Toronto, ON
Posts: 432
|
Quote:
|
|
|
|
|
|
06-23-2014, 07:33 PM
|
#30 |
|
Drives: 2010 Yaris 3 door, manual tran Join Date: Jul 2013
Location: --
Posts: 207
|
Pics of the lowered car!!!!!!!
|
|
|
|
|
06-23-2014, 07:35 PM
|
#31 |
|
Minimalist
Drives: 07 silver sedan Join Date: Jun 2014
Location: Mississauga, GTA, Toronto, ON
Posts: 432
|
Coming right up!
Sent from my XT1032 using Tapatalk |
|
|
|
|
06-23-2014, 07:37 PM
|
#32 |
|
Drives: 2010 Yaris 3 door, manual tran Join Date: Jul 2013
Location: --
Posts: 207
|
BTW it sounds like you had a tough time any fun in it though? I hope I can get some help when I need to install my tein springs
|
|
|
|
|
06-23-2014, 08:05 PM
|
#33 |
|
Minimalist
Drives: 07 silver sedan Join Date: Jun 2014
Location: Mississauga, GTA, Toronto, ON
Posts: 432
|
     For now. Have to wipe the licence plate from the front and rear shots Sent from my XT1032 using Tapatalk |
|
|
|
|
06-23-2014, 08:10 PM
|
#34 |

|
That looks awesome ...nice drop and love the wheels ...how low did u go ?
sent from Mars using Moto g ! |
|
|
|
|
06-23-2014, 08:10 PM
|
#35 |
|
Minimalist
Drives: 07 silver sedan Join Date: Jun 2014
Location: Mississauga, GTA, Toronto, ON
Posts: 432
|
Still need to adjust headlights and get an alignment
Sent from my XT1032 using Tapatalk |
|
|
|
|
06-23-2014, 08:12 PM
|
#36 |
|
|
Lol headlights ...I have been meaning to do same after I lowered my Yaris
sent from Mars using Moto g ! |
|
|
|
 |
| Thread Tools | |
| Display Modes | |
|
|
 Similar Threads
|
||||
| Thread | Thread Starter | Forum | Replies | Last Post |
| NEWS: TOYOTA REVEALS ALL-NEW YARIS SEDAN AT 2006 LOS ANGELES AUTO SHOW | VitzBoy | General Yaris / Vitz Discussion | 7 | 09-20-2023 07:50 AM |
| Compilation of Yaris How-tos/DIYs | YarisBueller | DIY / Maintenance / Service | 39 | 04-28-2018 08:47 AM |
| 2007 Yaris Pricing Info ! | YarisBueller | New YARIS Purchase Forum | 104 | 06-24-2009 04:54 PM |
| Yaris 2007 Sedan in Canada | David81 | New YARIS Purchase Forum | 16 | 09-09-2007 02:09 PM |
| My Review of My Yaris Sedan 2007 | David81 | New YARIS Purchase Forum | 6 | 09-10-2006 12:48 AM |


 Linear Mode

