
 |
 |
|
|
 10-22-2006, 01:50 AM
|
#19 |
 Drives: 2007 Yaris Liftback Join Date: Aug 2006
Location: Minnesota
Posts: 38
|
I just did something similiar to this to my gf's Yaris. I painted the middle silver pieces and the hood around the speedo. We found a color that matches the little blue dots that accent the black interior. I'll take some pics tommorow when I do the install.
|

|

|
|
10-22-2006, 10:40 AM
|
#20 |
|
I drive a yarrrris

Drives: 07 Sedan Polar White Join Date: Sep 2006
Location: Rochester, NY
Posts: 1,009
 |
anyone thats done this, or in the process of doing this wanna do a DIY guide?
__________________
 Docotrs say all the drikning has mesesd up my seplilng and radieng will work for parts |
|
|
|
|
10-22-2006, 03:01 PM
|
#21 |
|
Drives: 07 Yaris Sedan S, black/bisque Join Date: Oct 2006
Location: Wisconsin, USA
Posts: 38
|
Nice job, man. Personally I think it looks good. Some people just don't like a bright color matched with the dark. Gray is not too much different from black. At least it isn't a light gray.
|
|
|
|
|
10-23-2006, 02:10 PM
|
#22 |
|
Drives: 2007 Yaris Liftback Join Date: Aug 2006
Location: Minnesota
Posts: 38
|
Well I finished doing this on my girlfriends car. I turned out really good. Here's a quick run-through of what I did. Pics to follow.
1. Remove all the trim pieces you want to paint (you think?) 2. Sand all the pieces with 400 grit sandpaper. (the spray cans said to use 320 but I chose 400.) I didn't really sand like crazy, just enough so the entire pieces had a nice haze over them. 3. Wash the pieces with a damp towel to remove the sanding residue 4. Do a final once over with alcohol to remove any grease/oils. You will know you're done when the towel you're using no long picks up any color. 5. Spray the pieces with adhesion promoter http://www.duplicolor.com/products/adhesion.html Following the insructions on the back of the can. This stuff dries fast, so I put on 2-3 coats waiting 2-3 minutes between coats. 6. Within 10 minutes of the last coat of adhesion promoter drying, spray the color. Its important to spray the color on before the adhesion promoter fully dries, otherwise it doesn't really work like its supposed to. I did several light coats, waiting 10 minutes between each coat. I used this brand for my color http://www.duplicolor.com/products/truckvansuv.html It sounds kind of strange, but it says its formulated for plastics and interior pieces so I think it was a good match. 7. Within 30 minutes of your color coat drying, apply the clear-coat. I couldn't find the exact kind of clear-coat I used, but it was also duplicolor. Spray the first 2 coats on lightly, letting dry 10 minutes between coats. The final coat is a "wet coat". Keep spraying until it starts to look really glossy and wet. 8. Allow it to dry for a day at least before putting it back on your car. The can says to wait 7 days for the paint to cure before you add even more clear-coat. 9. You're done! Sit back and admire your work. 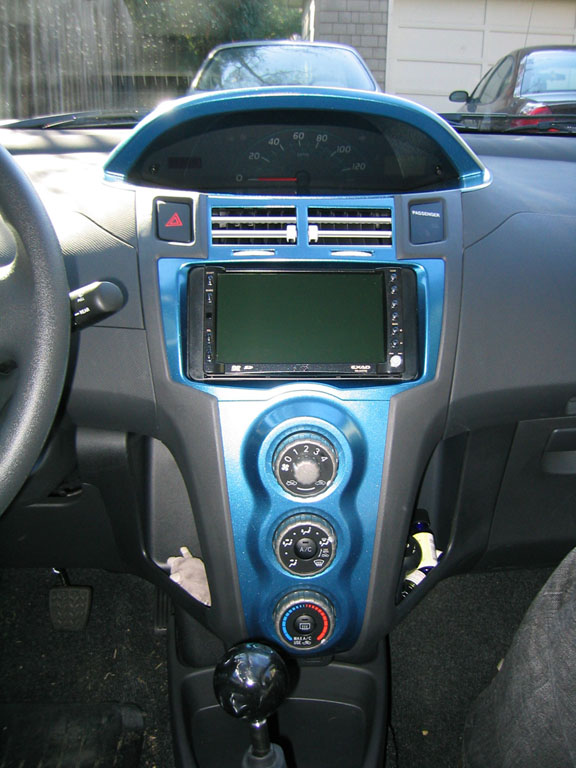 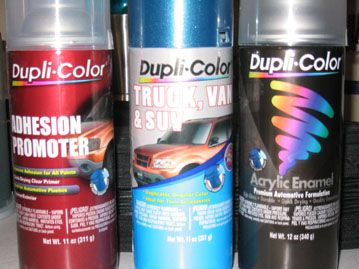 Here's the paint I used in case anybody needs to identify it at the store. If anybody has a better/different way to do it, go ahead and edit this, I'm by no means an expert. I was just very happy with the results I got, so I figured I'd share. -Casey Last edited by funkstrong; 10-23-2006 at 04:51 PM. |
|
|
|
|
10-23-2006, 02:21 PM
|
#23 |
|
I drive a yarrrris
Drives: 07 Sedan Polar White Join Date: Sep 2006
Location: Rochester, NY
Posts: 1,009
|
nice write-up. As soon as ya get the pics up I'll be putting it the Yarisworld DIY Manual.

__________________
Docotrs say all the drikning has mesesd up my seplilng and radieng will work for parts |
|
|
|
|
10-23-2006, 04:52 PM
|
#24 |
|
Drives: 2007 Yaris Liftback Join Date: Aug 2006
Location: Minnesota
Posts: 38
|
uploaded a few pics. Thinking about taping off the cup holder area and painting that too, think that would be overkill?
|
|
|
|
|
10-23-2006, 05:19 PM
|
#25 |
|
I drive a yarrrris
Drives: 07 Sedan Polar White Join Date: Sep 2006
Location: Rochester, NY
Posts: 1,009
|
edit: I'm a jackass and need to learn to read.
__________________
Docotrs say all the drikning has mesesd up my seplilng and radieng will work for parts Last edited by vodkalush; 10-23-2006 at 09:29 PM. |
|
|
|
|
10-23-2006, 06:32 PM
|
#26 |
|
The LittleBastard

Drives: 2007 Yaris Liftback Join Date: Sep 2006
Location: Los Angeles, CA
Posts: 297
|
funkstrong that looks very good. Great match with the paint chose aswell. You beat me to it. I've been waiting to the the same thing, but was waiting for the semester to end before ripping the interior apart. Great write up. I'll follow your instructions for my process, but I'll also be painting the arm rests on the doors along with the front and rear pillars. Going to put a gray interior matching carpet on the roof to finish her off.
__________________
Yaris Mods: 20% Tints Ground wires 2007 Toyota Yaris Liftback - Current 2004 Honda S2000 - Sold 1986 Toyota Corolla SR5 - Sold DIY: Groundwire Kit |
|
|
|
 |
|
|


 Linear Mode

