

 |
 |
|
|
|
|
 01-15-2010, 08:28 AM
|
#1 | |
 ULTIMATE ULTIMATE
Drives: 09 5dr LB, 2x 08 3dr LB Join Date: Oct 2008
Location: USA, CT
Posts: 13,450
|
Quote:
|
|

|

|
|
01-15-2010, 02:39 PM
|
#2 | |
 
Drives: Black HB Join Date: Oct 2008
Location: AK
Posts: 542
|
Quote:
__________________
|
|
|
|
|
|
10-03-2009, 09:18 PM
|
#3 |
|
My R1 eats my Vitz!!

Drives: '07 Vitz Lifty, Stick Shift Join Date: May 2007
Location: Oneida, NY
Posts: 131
|
Installation of CTScotts LED Module for DIY Cruise Control
Wasn't sure where to post this...a new thread or here...
1. Disconnect negative battery terminal...  2. Remove all plastics around radio and then remove gauge cluster...  3. Remove two screws in front of the gauge cluster...  4. Remove screws in both cup holders...  5. Remove glove box. Open and pop out tabs on both sides...   6. Unplug yellow airbag connector and remove two bolts with a 12mm socket...   7. Make sure you have a long socket (this one's a bit overkill) or you will knock your knuckles (it hurts) the bolts are tight...  8. Remove A-pillers. Pull back the rubber casing and pull them right off (gently)...   9. And there you have it...that's all that holds on your dash...now just pull that sucker out...    After that it's pretty much cut and splice wires to insert the Module. 10. Choose a spot to mount the module. I put mine in between the center vent outlet and the radio.  11. Connect the wires to their appropriate counterparts. Connect the LED wires to your LED (duh)  Connect the ACC power wire to any source of ACC power (any wire that gets 12 volts when you turn the key to the ON position). I chose the pink one on the steering column (ignition connector)  And finally connect the Switch power wires. The red to your wire going from the switch to the ECM and the black to any grounding point.  12. And there you have it. Hook your battery back up quick and test it to make sure it works (unhook the battery again before you plug your airbag back in) then put everything back together. I put my LED in the gauge cluster to make it look semi-stock. I used a white LED and scrapped a little hole in the black paint on the face plate inside the plastic housing. You can see the white dot right under the trip meter reset button. You can't even see it until you hit the CC switch so it's kind of hidden.  Hope this helps anyone planning on doing something similar. I know CTScott said he would sell these modules for $25 or so. It's a very easy install and I recommend it so you don't always have to wonder "did I already turn it on?" Let me know if you have any questions. Video... http://s236.photobucket.com/albums/f...t=CIMG7073.flv
__________________
My Car Rules! |
|
|
|
|
10-07-2009, 11:03 PM
|
#4 |

|
Install for 2009 5DR Auto w/Power Package
My own experience:
I used a stalk from an '05 Solara which had a cable attached to a 12-pin connector. I had to de-pin the two cruise control wires. 1. Disconnect negative cable from battery using 10mm socket wrench. 2. Unscrew left and right T30 bolts to unfasten airbag. 3. Lift airbag off steering wheel and gently pry up the yellow locking tabs. 4. Remove horn cable from clockspring and disconnect from airbag. 5. Lift locking tab from connector and insert the two stalk wires. 6. Drilled out rear steering wheel cover by aligning stalk and eyeballing position. 7. Fastened stalk, seated cable into clip, and plugged into clockspring. 8. Plugged in airbag, secured bolts, and reconnected battery. |
|
|
|
|
01-14-2010, 11:55 PM
|
#5 |
|
Lurker supreme!

Drives: old and boosted! Join Date: Nov 2006
Location: Ottawa, ON, Canada
Posts: 792
|
Bump!
I just spent 2 hours reading this *whole* thread. Wow. You guys are awesome... I love these pioneering threads. So much excitement and discovery... reminds me of the Blitz install threads from the summer of '08!  I just bought a stalk for my Canadian '06 hatch (RS). I figure I'll be running wires to the ECM. But how I would love it if the RS trim happened to have the dash lights already! In fact, I'm going to go out into the garage right now *brrrr* with a flashlight and find out! (Won't be doing the install until warmer weather though!) -- EDIT: Nope... no dash light.  Anyhow, thanks to all... YW FTW! 
__________________
2006 Red Blitzed RS 5-door Last edited by Doc Zaius; 01-15-2010 at 12:50 AM. |
|
|
|
|
03-17-2010, 04:47 PM
|
#6 |
|
Drives: 09 sedan Join Date: Mar 2010
Location: bristol, tn
Posts: 6
|
Is the wire included if I order one of these from toyota parts zone?
84632-08021 Two months old and all, but this seems like the thread to beat. |
|
|
|
|
03-17-2010, 04:56 PM
|
#7 | |
|
ULTIMATE
Drives: 09 5dr LB, 2x 08 3dr LB Join Date: Oct 2008
Location: USA, CT
Posts: 13,450
|
Quote:
|
|
|
|
|
|
03-19-2010, 03:58 AM
|
#8 |
|
Drives: 09 sedan Join Date: Mar 2010
Location: bristol, tn
Posts: 6
|
I know I'm getting off light because I'm an 09, but how much harder is it to replace the steering wheel wheel cover rather than drilling the hole? Fear of the clockspring seems to be a recurring theme in these threads.
|
|
|
|
|
03-19-2010, 07:49 AM
|
#9 | |
|
ULTIMATE
Drives: 09 5dr LB, 2x 08 3dr LB Join Date: Oct 2008
Location: USA, CT
Posts: 13,450
|
Quote:
|
|
|
|
|
|
03-23-2010, 05:00 AM
|
#10 |
|
Drives: 09 sedan Join Date: Mar 2010
Location: bristol, tn
Posts: 6
|
Parts are pretty close and I'm still trying to get up the nerve to do this myself.
Could you be a little more specific about being careful with the clockspring? From this thread it looks like the biggest concerns would be not spinning the clockspring and not damaging the wires coming out of it. What else do I need to look out for? All this cause I don't want to pay a guy a hundred and fifty bucks. |
|
|
|
|
03-23-2010, 07:59 AM
|
#11 | |
|
ULTIMATE
Drives: 09 5dr LB, 2x 08 3dr LB Join Date: Oct 2008
Location: USA, CT
Posts: 13,450
|
Quote:
|
|
|
|
|
|
03-27-2010, 03:57 AM
|
#12 |
|
Drives: 09 sedan Join Date: Mar 2010
Location: bristol, tn
Posts: 6
|
Well, in as much as I didn't ruin the steering wheel, clockspring, horn, or airbag, it went ok. Getting nothing out of the cruise, though. Was I supposed to have the power package or something? Boy I feel terrible.
Automatic 09 sedan and this guy. CTScott, you've been incredibly kind. |
|
|
|
|
03-27-2010, 08:18 AM
|
#13 | |
|
ULTIMATE
Drives: 09 5dr LB, 2x 08 3dr LB Join Date: Oct 2008
Location: USA, CT
Posts: 13,450
|
Quote:
On the connector at the other end of the clock spring (the one on the bottom of the steering column) does your sedan have the blue and brown wires, or just the black wire? Some of the 09 sedans have the wiring from the ECM to that connector, others do not (and hence you have to run the wire from the connector to the ECM poin 40). All 09 LBs had that wire run, but not all Sedans. |
|
|
|
|
|
03-27-2010, 04:39 PM
|
#14 |
|
Drives: 09 sedan Join Date: Mar 2010
Location: bristol, tn
Posts: 6
|
Took off steering column cover and I've got one black wire. Still calling this a win if I don't have to take the steering wheel off anymore.
So two wires where the blue and brown ones would be. Which one goes where? All the crosstalk between autos and manuals and stalks and switches has jellied my brain. Should I switch to PM or something? I'm feeling less potentially instructive by the minute. Last edited by stvee; 03-28-2010 at 06:22 AM. |
|
|
|
|
03-28-2010, 10:22 AM
|
#15 | |
|
ULTIMATE
Drives: 09 5dr LB, 2x 08 3dr LB Join Date: Oct 2008
Location: USA, CT
Posts: 13,450
|
Quote:
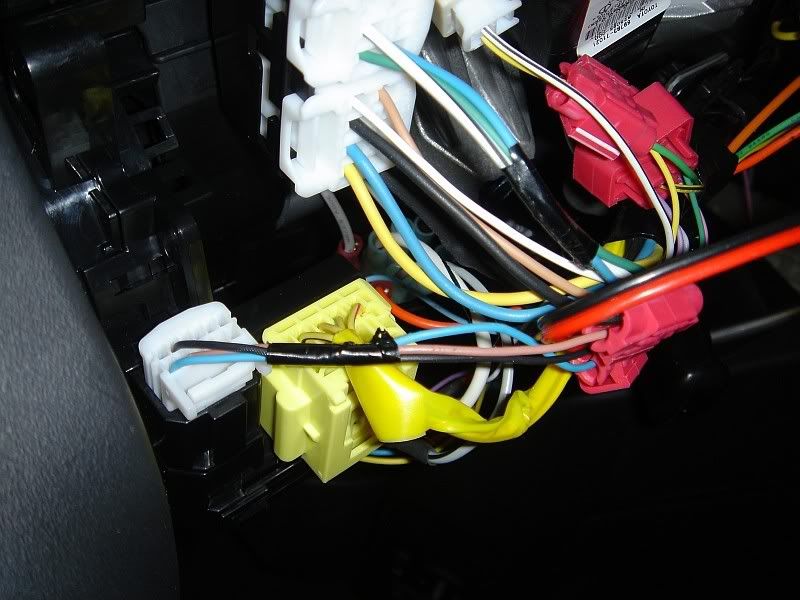 In this thread, I have the part numbers for the pins for that connector: http://www.yarisworld.com/forums/sho...ght=diy+cruise |
|
|
|
|
|
04-10-2010, 04:03 PM
|
#16 |
|
Drives: 09 sedan Join Date: Mar 2010
Location: bristol, tn
Posts: 6
|
We are talking about the connector furthest left of that picture, right? I ordered two spiral connector repair terminals and one ecm repair terminal. The connector in the ecm repair terminal looked like a perfect fit for the ones in the steering column. Should I go for two more of those or do I have the wrong connector?
|
|
|
|
|
04-10-2010, 09:18 PM
|
#17 | |
|
ULTIMATE
Drives: 09 5dr LB, 2x 08 3dr LB Join Date: Oct 2008
Location: USA, CT
Posts: 13,450
|
Quote:
http://www.yarisworld.com/forums/sho...ght=diy+cruise |
|
|
|
|
|
11-26-2010, 09:39 PM
|
#18 |
|
ULTIMATE
Drives: 09 5dr LB, 2x 08 3dr LB Join Date: Oct 2008
Location: USA, CT
Posts: 13,450
|
^Exactly. The starting clutch switch and the cruise clutch switch have exactly opposite purposes. The starting one is a "safety" which wants to see the clutch fully depressed and the cruise one cancels cruise mode to prevent revving as soon as the clutch is touched. The OEM clutch switch is under $20, so it's really not worth looking for an alternative solution.
__________________
|
|
|
|
 |
|
|
 Similar Threads
|
||||
| Thread | Thread Starter | Forum | Replies | Last Post |
| DIY - 2009 Cruise Control for $10, without pulling the steering wheel and airbag | CTScott | DIY / Maintenance / Service | 307 | 04-04-2023 03:43 AM |
| DIY Cruise Control on 07-08 Yaris (step by step) | Vince87 | DIY / Maintenance / Service | 431 | 12-28-2020 01:37 AM |
| Cruise Control - Again! | CB900F2 | DIY / Maintenance / Service | 47 | 06-17-2010 06:29 PM |
| Cruise control vs MPG | YarisOwnersDad | Fuel Economy Forum | 15 | 05-29-2009 03:55 PM |
| Using Cruise control | Driver | General Yaris / Vitz Discussion | 14 | 11-09-2006 10:12 PM |



 Hybrid Mode
